> ## Documentation Index
> Fetch the complete documentation index at: https://www.bolna.ai/docs/llms.txt
> Use this file to discover all available pages before exploring further.
# Set Up Inbound Calls & Caller Matching
> Configure inbound call settings for Bolna Voice AI. Match callers using CSV, Google Sheets, or API. Set up spam prevention and preload customer data.
## What is the Inbound Tab?
The Inbound Tab is where you configure settings for receiving incoming calls. Match callers to your database, preload user data before the call starts, and set up spam prevention to protect your agents from abuse.
 ***
## Database for Inbound Phone Numbers
Match incoming calls to users and preload their data before the call starts. Choose from three data source options:
Connect your own API to fetch user data dynamically when a call comes in.
***
## Database for Inbound Phone Numbers
Match incoming calls to users and preload their data before the call starts. Choose from three data source options:
Connect your own API to fetch user data dynamically when a call comes in.
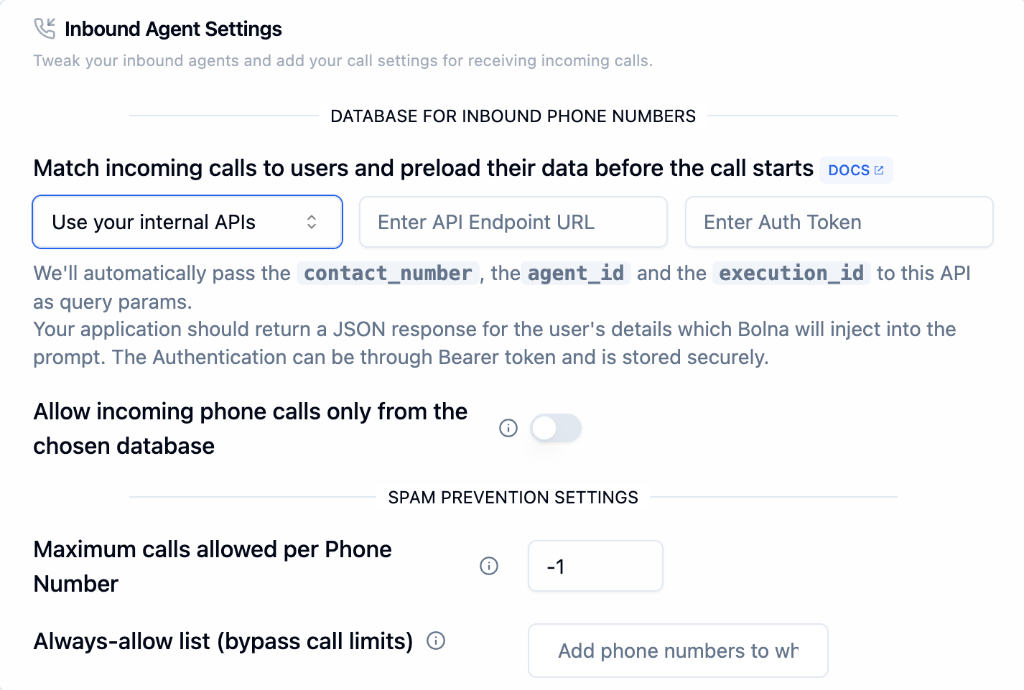 Choose **"Use your internal APIs"** from the dropdown.
Provide your API endpoint that will receive the caller data request.
Enter your Bearer token for secure authentication.
### Query Parameters
Bolna automatically passes these parameters to your API:
| Parameter | Description |
| ---------------- | ------------------------------- |
| `contact_number` | The caller's phone number |
| `agent_id` | Your agent's identifier |
| `execution_id` | Unique identifier for this call |
**Your API must return a JSON response** with user details. Bolna will inject this data directly into your agent's prompt for personalized conversations.
### Example API Request
```bash theme={"system"}
curl -X GET "https://your-api.com/user-data?contact_number=+919876543210&agent_id=abc123&execution_id=xyz789" \
-H "Authorization: Bearer YOUR_AUTH_TOKEN" \
-H "Content-Type: application/json"
```
### Example API Response
```json theme={"system"}
{
"user_name": "John Doe",
"account_status": "premium",
"last_purchase": "2026-01-15"
}
```
Authentication uses Bearer token and is stored securely by Bolna.
Upload a CSV file containing your user database.
Choose **"Use your internal APIs"** from the dropdown.
Provide your API endpoint that will receive the caller data request.
Enter your Bearer token for secure authentication.
### Query Parameters
Bolna automatically passes these parameters to your API:
| Parameter | Description |
| ---------------- | ------------------------------- |
| `contact_number` | The caller's phone number |
| `agent_id` | Your agent's identifier |
| `execution_id` | Unique identifier for this call |
**Your API must return a JSON response** with user details. Bolna will inject this data directly into your agent's prompt for personalized conversations.
### Example API Request
```bash theme={"system"}
curl -X GET "https://your-api.com/user-data?contact_number=+919876543210&agent_id=abc123&execution_id=xyz789" \
-H "Authorization: Bearer YOUR_AUTH_TOKEN" \
-H "Content-Type: application/json"
```
### Example API Response
```json theme={"system"}
{
"user_name": "John Doe",
"account_status": "premium",
"last_purchase": "2026-01-15"
}
```
Authentication uses Bearer token and is stored securely by Bolna.
Upload a CSV file containing your user database.
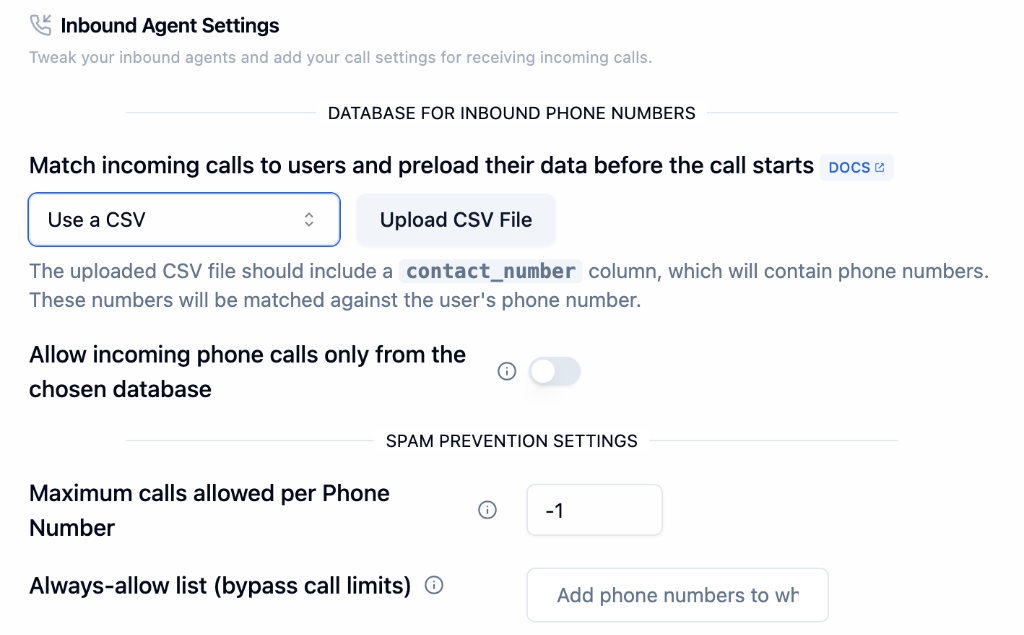 Choose **"Use a CSV"** from the dropdown.
Click **Upload CSV File** and select your file.
The CSV file **must include a `contact_number` column** containing phone numbers. These numbers will be matched against the caller's phone number.
### CSV Format Example
```csv theme={"system"}
contact_number,user_name,account_type
+919876543210,John Doe,premium
+918765432109,Jane Smith,basic
```
Connect a public Google Sheet as your user database.
Choose **"Use a CSV"** from the dropdown.
Click **Upload CSV File** and select your file.
The CSV file **must include a `contact_number` column** containing phone numbers. These numbers will be matched against the caller's phone number.
### CSV Format Example
```csv theme={"system"}
contact_number,user_name,account_type
+919876543210,John Doe,premium
+918765432109,Jane Smith,basic
```
Connect a public Google Sheet as your user database.
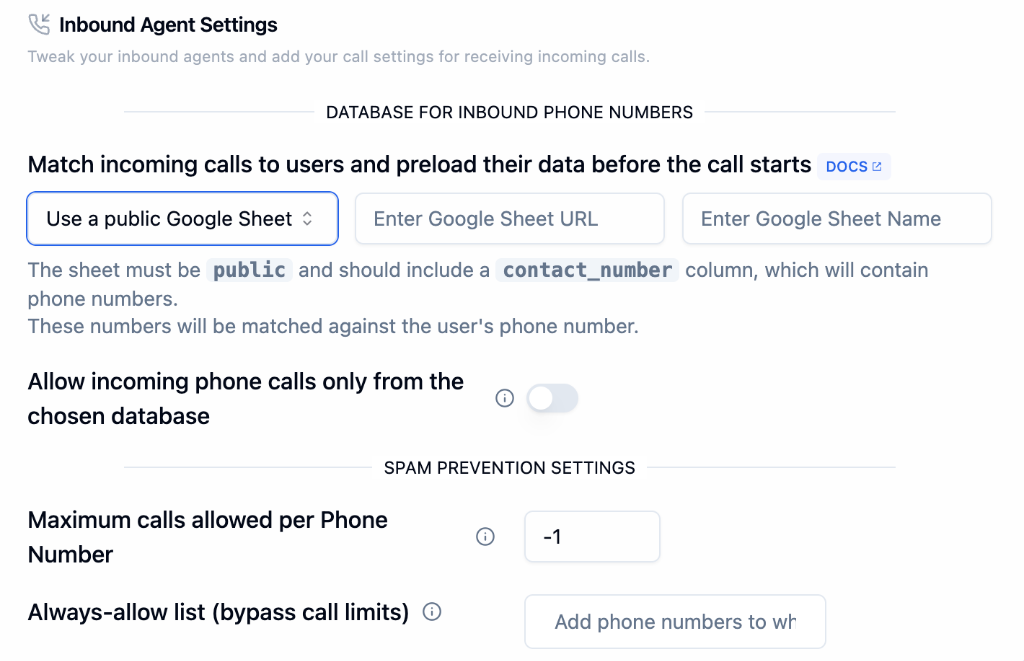 Choose **"Use a public Google Sheet"** from the dropdown.
Paste the URL of your public Google Sheet.
Specify the exact name of the sheet tab to use.
The sheet **must be public** and should include a `contact_number` column containing phone numbers.
***
## Call Restrictions
Toggle on **"Allow Calls Only from Database"** to restrict incoming calls to only phone numbers found in your chosen database. Unknown callers will be rejected.
***
## Spam Prevention Settings
Protect your agent from spam and abuse.
| Setting | Description |
| ---------------------------------- | ------------------------------------------------------------ |
| **Maximum Calls per Phone Number** | Limit calls from a single number. Set to `-1` for unlimited. |
| **Always-Allow List** | Phone numbers that bypass all call limits. |
Add your support team and VIP customers to the Always-Allow List to ensure they're never blocked.
***
## Use Cases
Only allow calls from registered customers
Preload customer data for personalized service
Limit repeated calls from the same number
Fetch real-time customer data via API
***
## Next Steps
Configure prompts and welcome message
Set up telephony and call management
Complete inbound setup guide
Purchase and manage phone numbers
Choose **"Use a public Google Sheet"** from the dropdown.
Paste the URL of your public Google Sheet.
Specify the exact name of the sheet tab to use.
The sheet **must be public** and should include a `contact_number` column containing phone numbers.
***
## Call Restrictions
Toggle on **"Allow Calls Only from Database"** to restrict incoming calls to only phone numbers found in your chosen database. Unknown callers will be rejected.
***
## Spam Prevention Settings
Protect your agent from spam and abuse.
| Setting | Description |
| ---------------------------------- | ------------------------------------------------------------ |
| **Maximum Calls per Phone Number** | Limit calls from a single number. Set to `-1` for unlimited. |
| **Always-Allow List** | Phone numbers that bypass all call limits. |
Add your support team and VIP customers to the Always-Allow List to ensure they're never blocked.
***
## Use Cases
Only allow calls from registered customers
Preload customer data for personalized service
Limit repeated calls from the same number
Fetch real-time customer data via API
***
## Next Steps
Configure prompts and welcome message
Set up telephony and call management
Complete inbound setup guide
Purchase and manage phone numbers