> ## Documentation Index
> Fetch the complete documentation index at: https://www.bolna.ai/docs/llms.txt
> Use this file to discover all available pages before exploring further.
# Workflows and Campaigns
> Create automated communication sequences with Bolna workflows and campaigns. Build multi-step outreach flows with calls, WhatsApp, and email automation.
Access the Campaigns at [https://platform.bolna.ai/campaigns](https://platform.bolna.ai/campaigns)
## Overview
Create automated communication sequences with phone calls, WhatsApp messages, and email notifications. Chain workflows with conditional logic to build complex multi-step campaigns.
 ### Key Concepts
Reusable templates of multi-step communications (calls, WhatsApp, emails) including delays between steps
Deployments that execute workflows with specific contact data and timing
Individual actions within a workflow (call, WhatsApp, email, retry)
Conditions that determine workflow transitions and campaign flow
***
## Workflows
### What are Workflows?
Reusable sequences of communication steps that define the type, timing, and order of actions across multiple campaigns.
### Workflow Step Types
**Purpose**: Initiate outbound phone calls to contacts
**Features**: AI-powered conversations, voicemail detection, call timeout settings
**Timing**: Configurable delay from previous step
**Purpose**: Send WhatsApp messages to contacts
**Features**: Pre-notification before calls, interactive buttons and CTAs
**Prerequisite**: Ai Sensy API key must be connected
**Purpose**: Send email notifications and follow-ups
**Features**: Template-based emails, scheduling information
**Timing**: Configurable delay from previous step
***
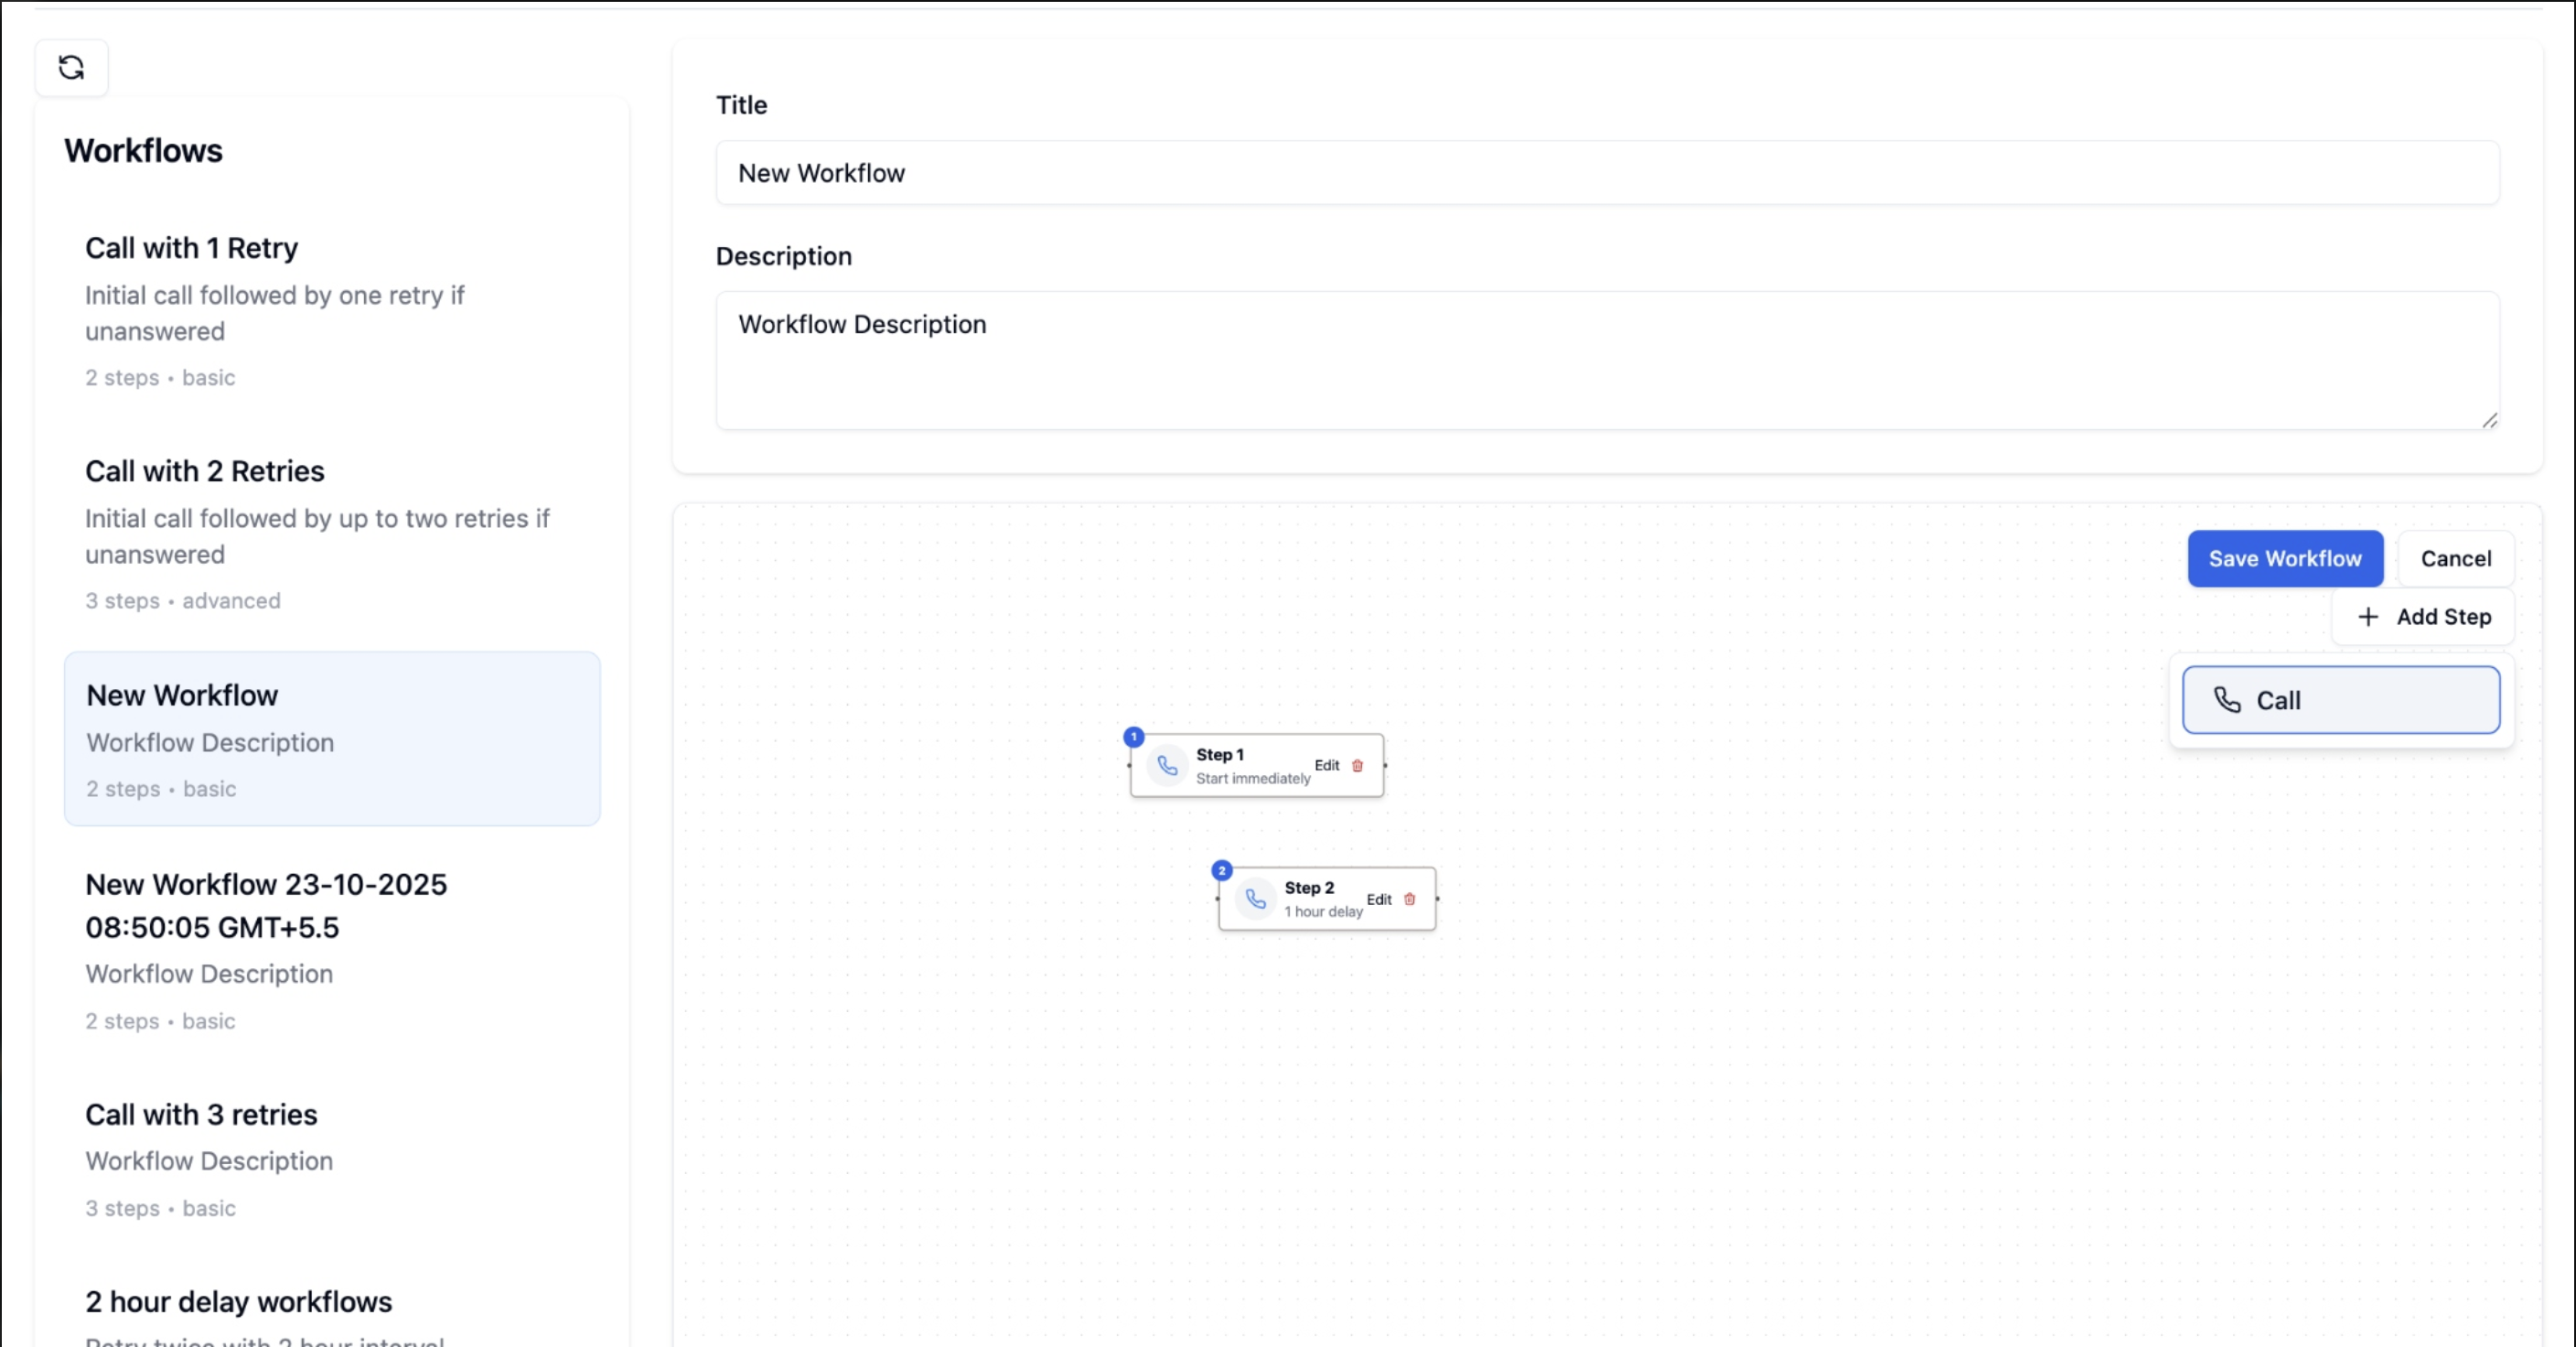
### Creating Workflows
1. Navigate to the **Workflows** section in your dashboard
2. Click **"Add New Workflow"** or select an existing workflow to edit
3. The visual workflow builder opens with drag-and-drop functionality
### Key Concepts
Reusable templates of multi-step communications (calls, WhatsApp, emails) including delays between steps
Deployments that execute workflows with specific contact data and timing
Individual actions within a workflow (call, WhatsApp, email, retry)
Conditions that determine workflow transitions and campaign flow
***
## Workflows
### What are Workflows?
Reusable sequences of communication steps that define the type, timing, and order of actions across multiple campaigns.
### Workflow Step Types
**Purpose**: Initiate outbound phone calls to contacts
**Features**: AI-powered conversations, voicemail detection, call timeout settings
**Timing**: Configurable delay from previous step
**Purpose**: Send WhatsApp messages to contacts
**Features**: Pre-notification before calls, interactive buttons and CTAs
**Prerequisite**: Ai Sensy API key must be connected
**Purpose**: Send email notifications and follow-ups
**Features**: Template-based emails, scheduling information
**Timing**: Configurable delay from previous step
***
### Creating Workflows
1. Navigate to the **Workflows** section in your dashboard
2. Click **"Add New Workflow"** or select an existing workflow to edit
3. The visual workflow builder opens with drag-and-drop functionality
 1. **Add Steps**: Click the **"Add Step"** button to insert new communication steps
2. **Step Types**: Choose from Call, WhatsApp, or Email
1. **Add Steps**: Click the **"Add Step"** button to insert new communication steps
2. **Step Types**: Choose from Call, WhatsApp, or Email
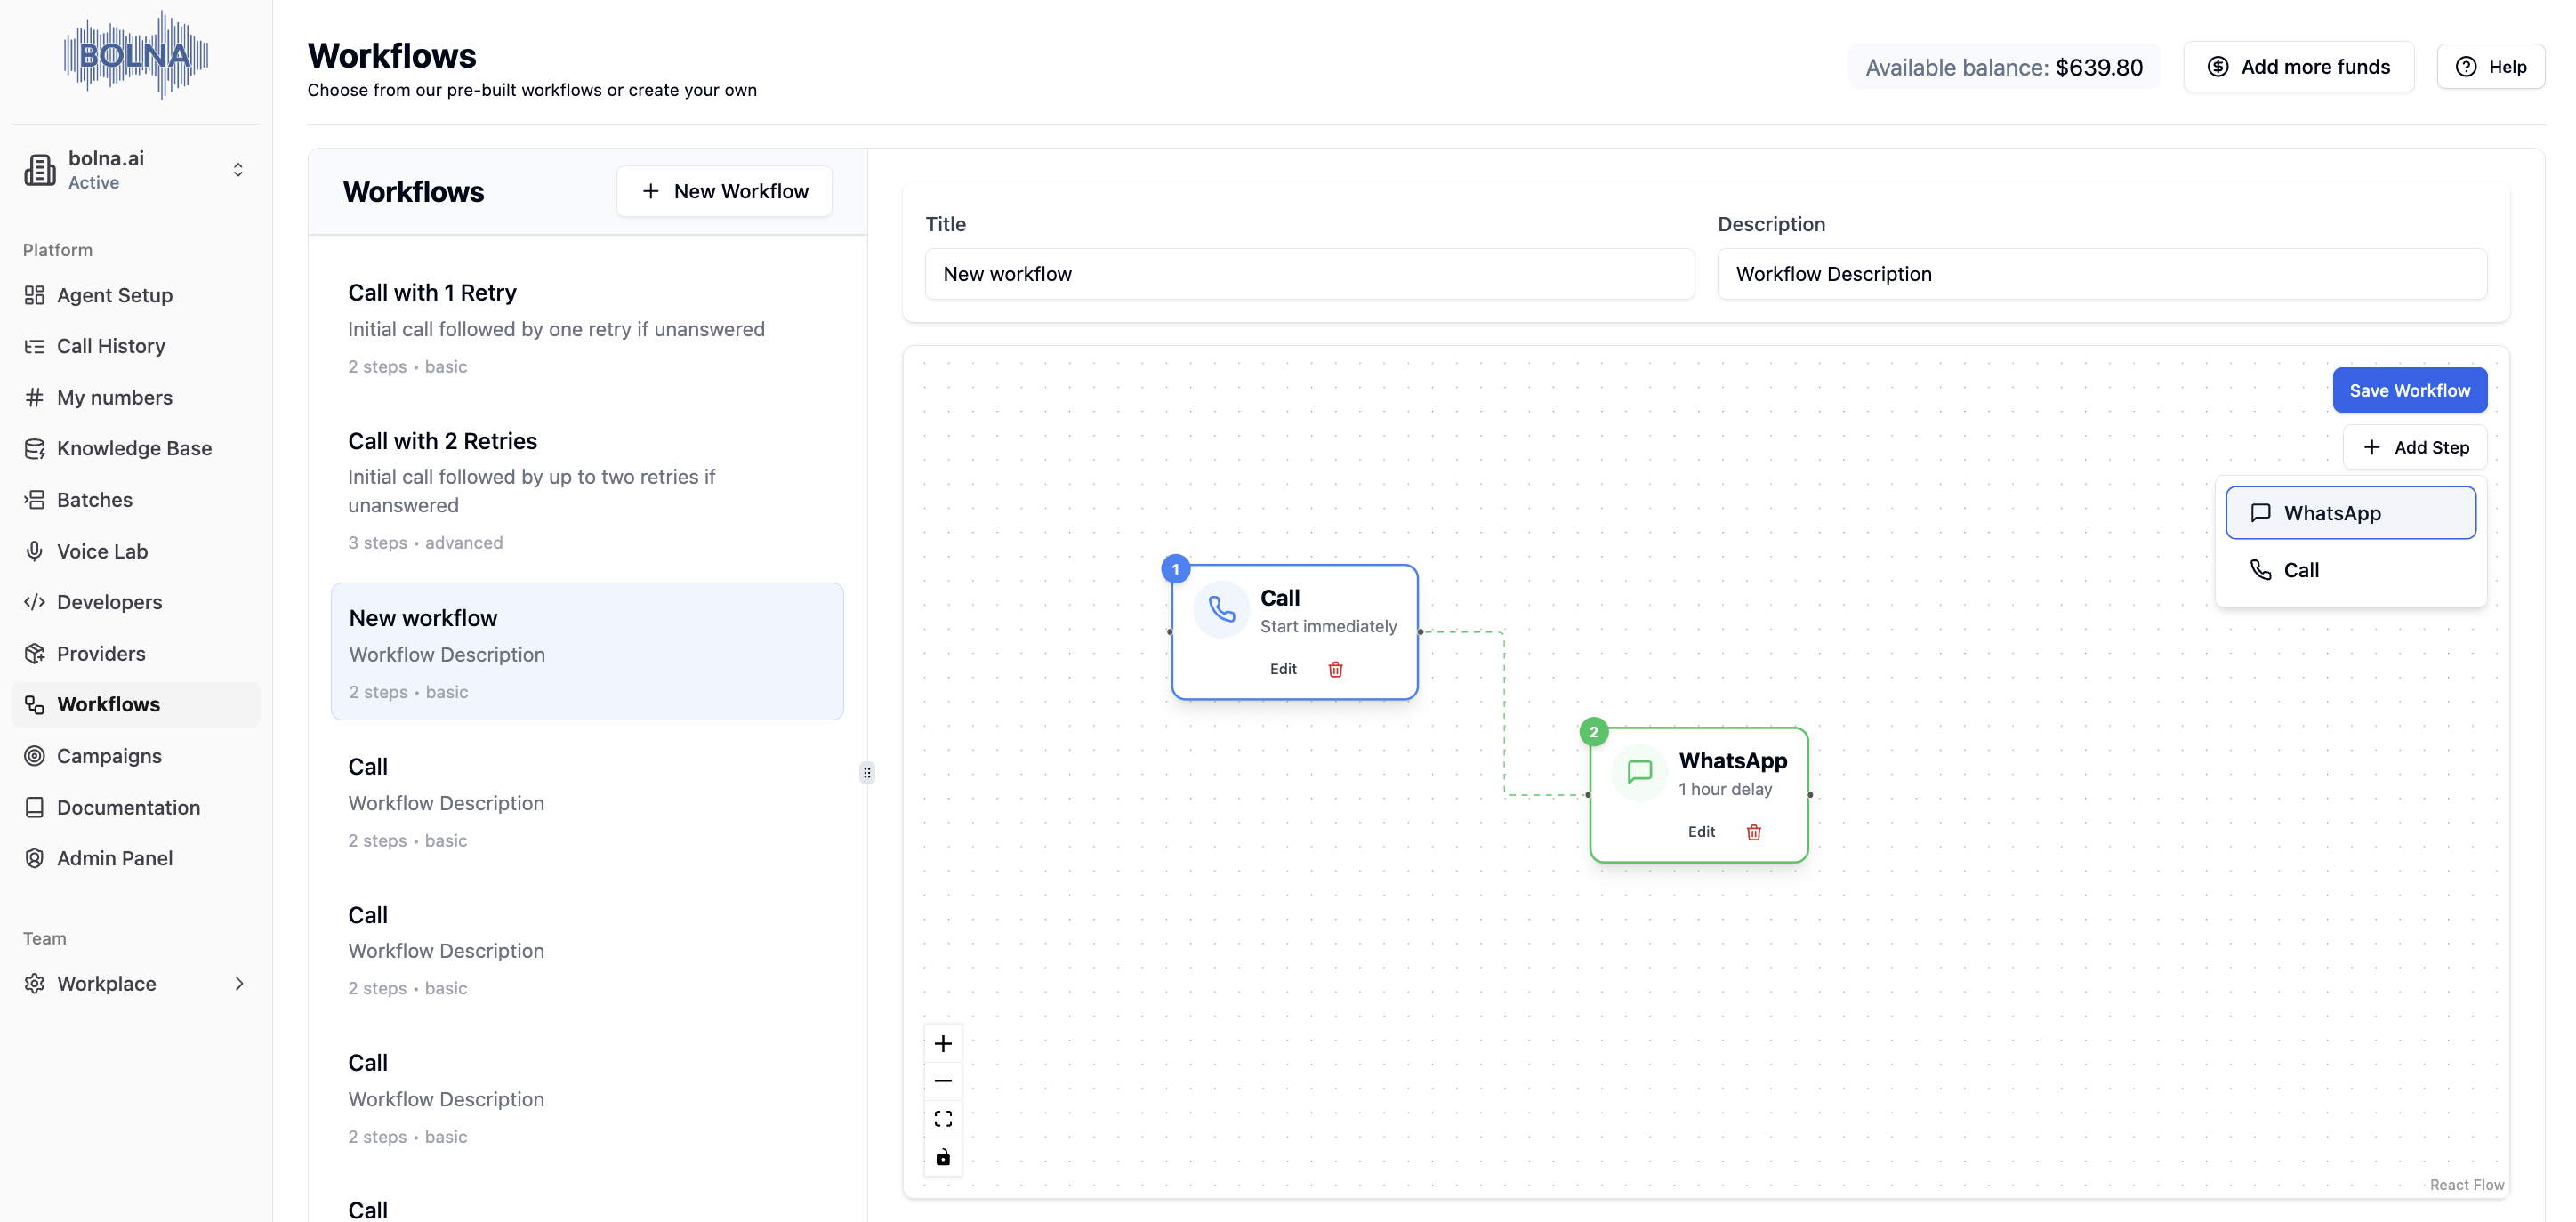
 **Adding WhatsApp Steps:**
1. Click the **"+ Add Step"** button in the workflow builder
2. Select **"WhatsApp"** from the dropdown menu
3. The WhatsApp step will appear in your workflow canvas
**Adding WhatsApp Steps:**
1. Click the **"+ Add Step"** button in the workflow builder
2. Select **"WhatsApp"** from the dropdown menu
3. The WhatsApp step will appear in your workflow canvas
 * **Step Label**: Give each step a descriptive name
* **Timing**: Set delay in minutes from previous step
* **Step Configuration**: Configure specific settings for each step type
* **Step Label**: Give each step a descriptive name
* **Timing**: Set delay in minutes from previous step
* **Step Configuration**: Configure specific settings for each step type
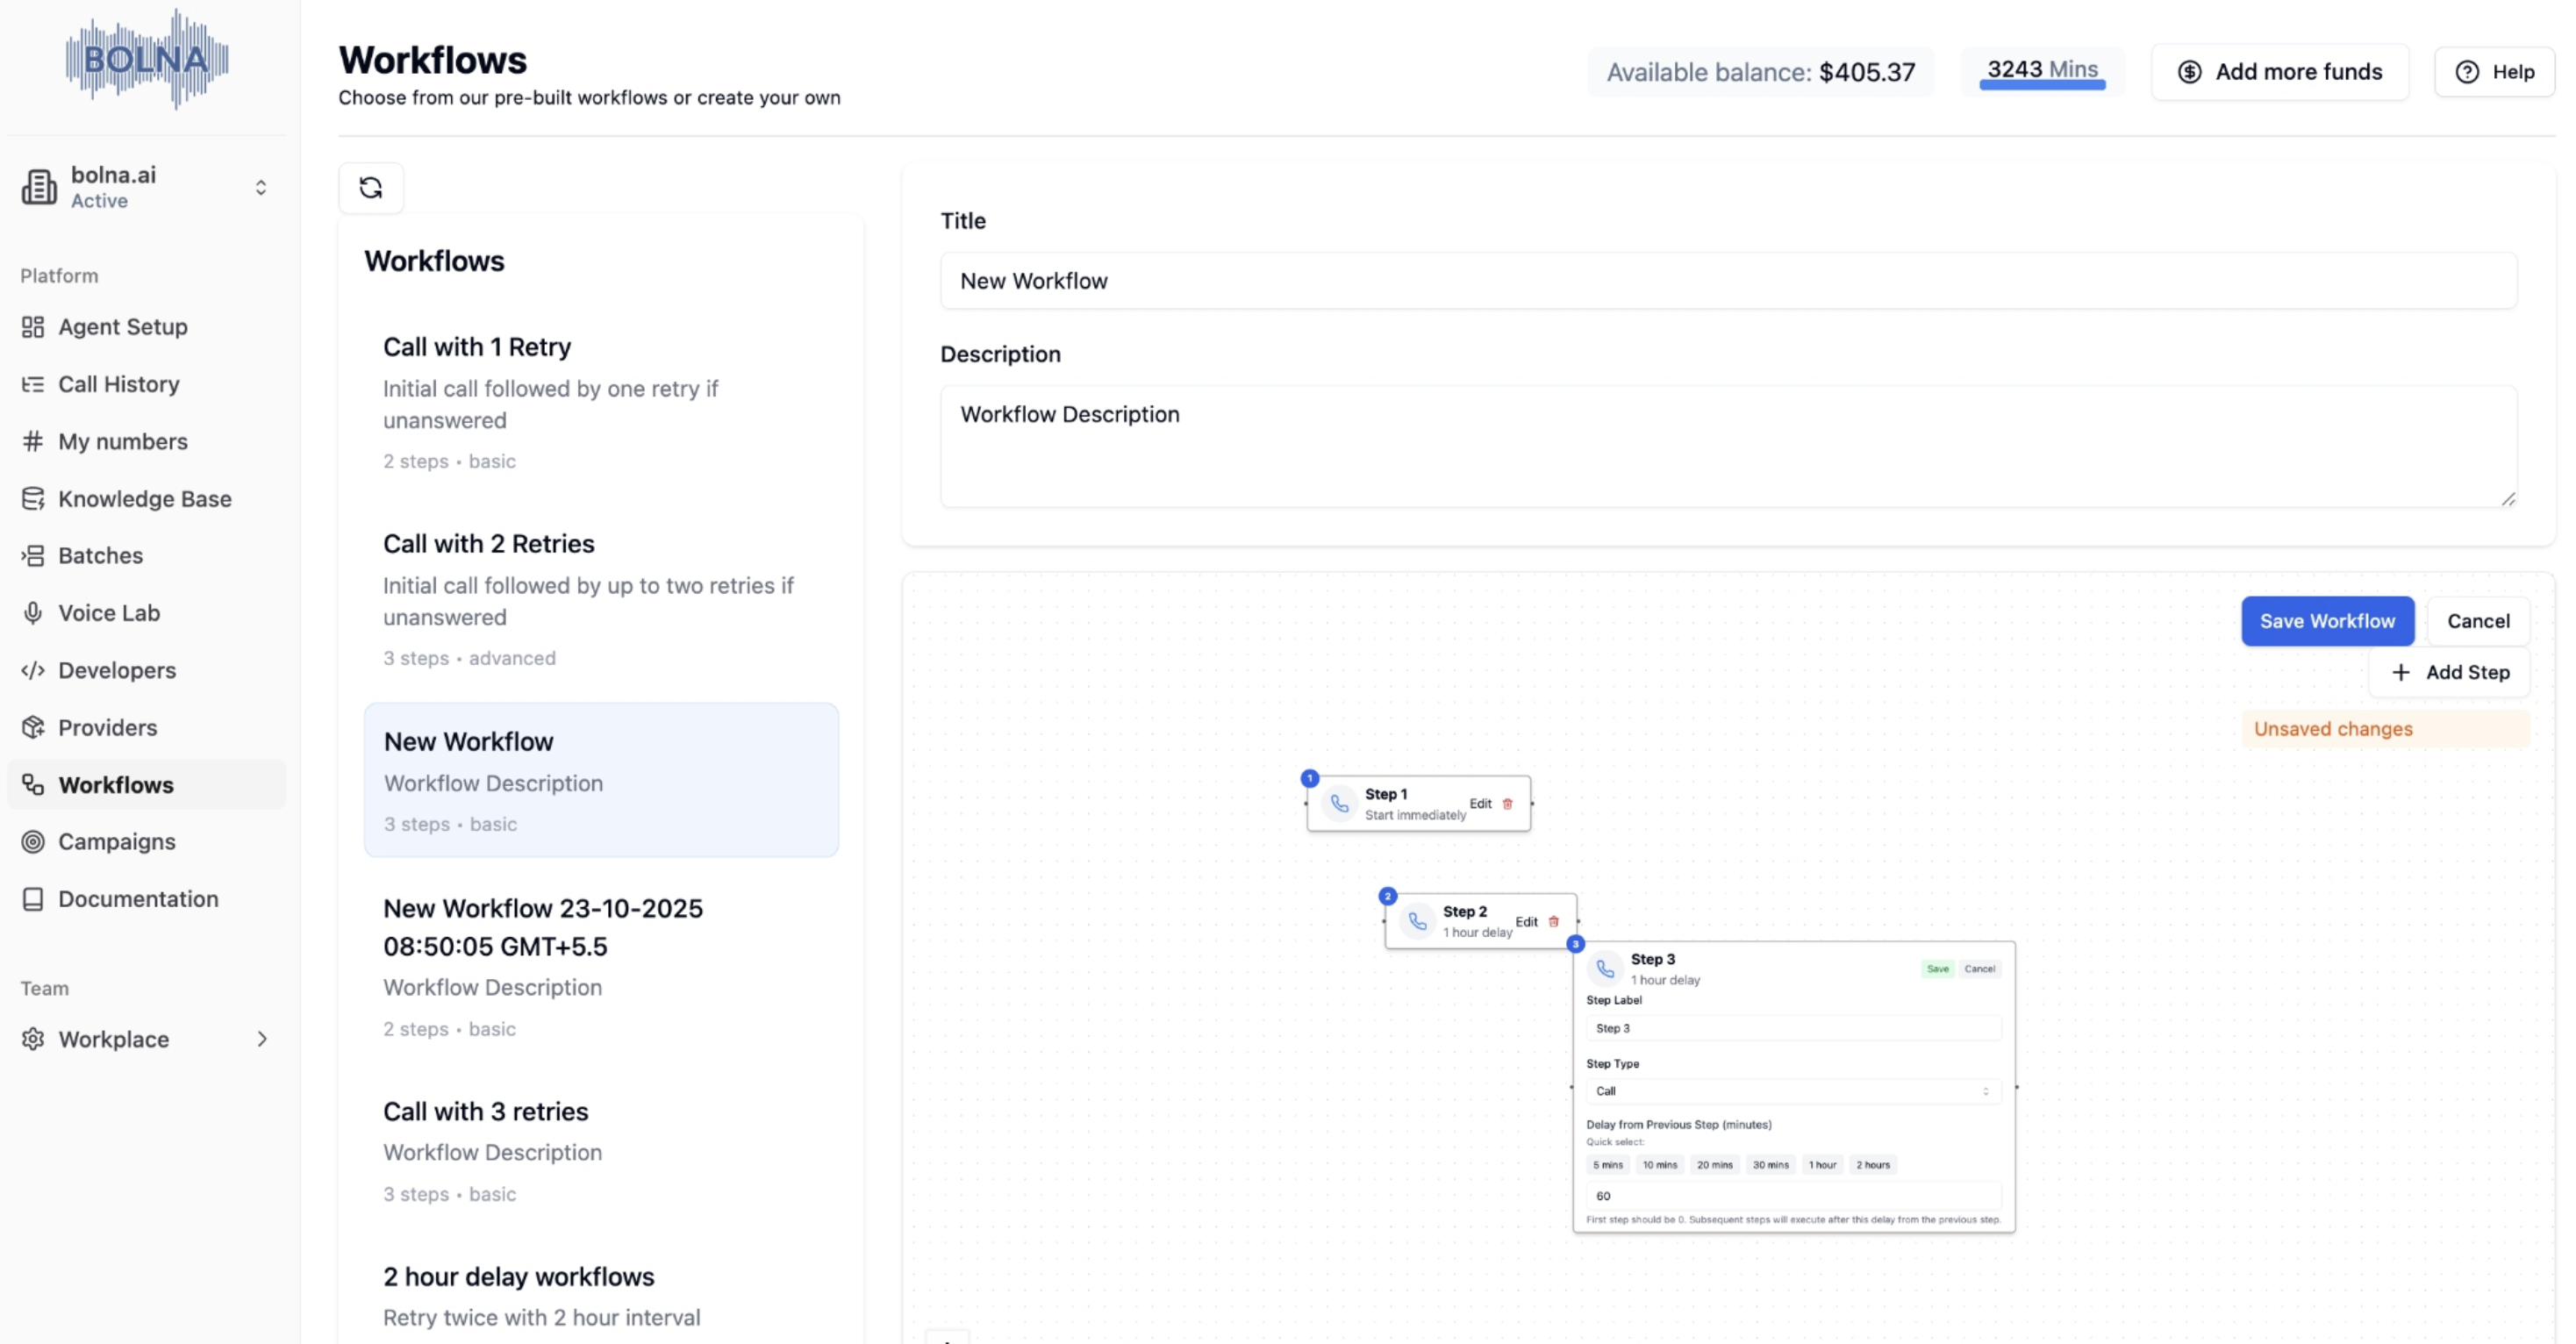 Click **"Save Workflow"** to persist your changes
***
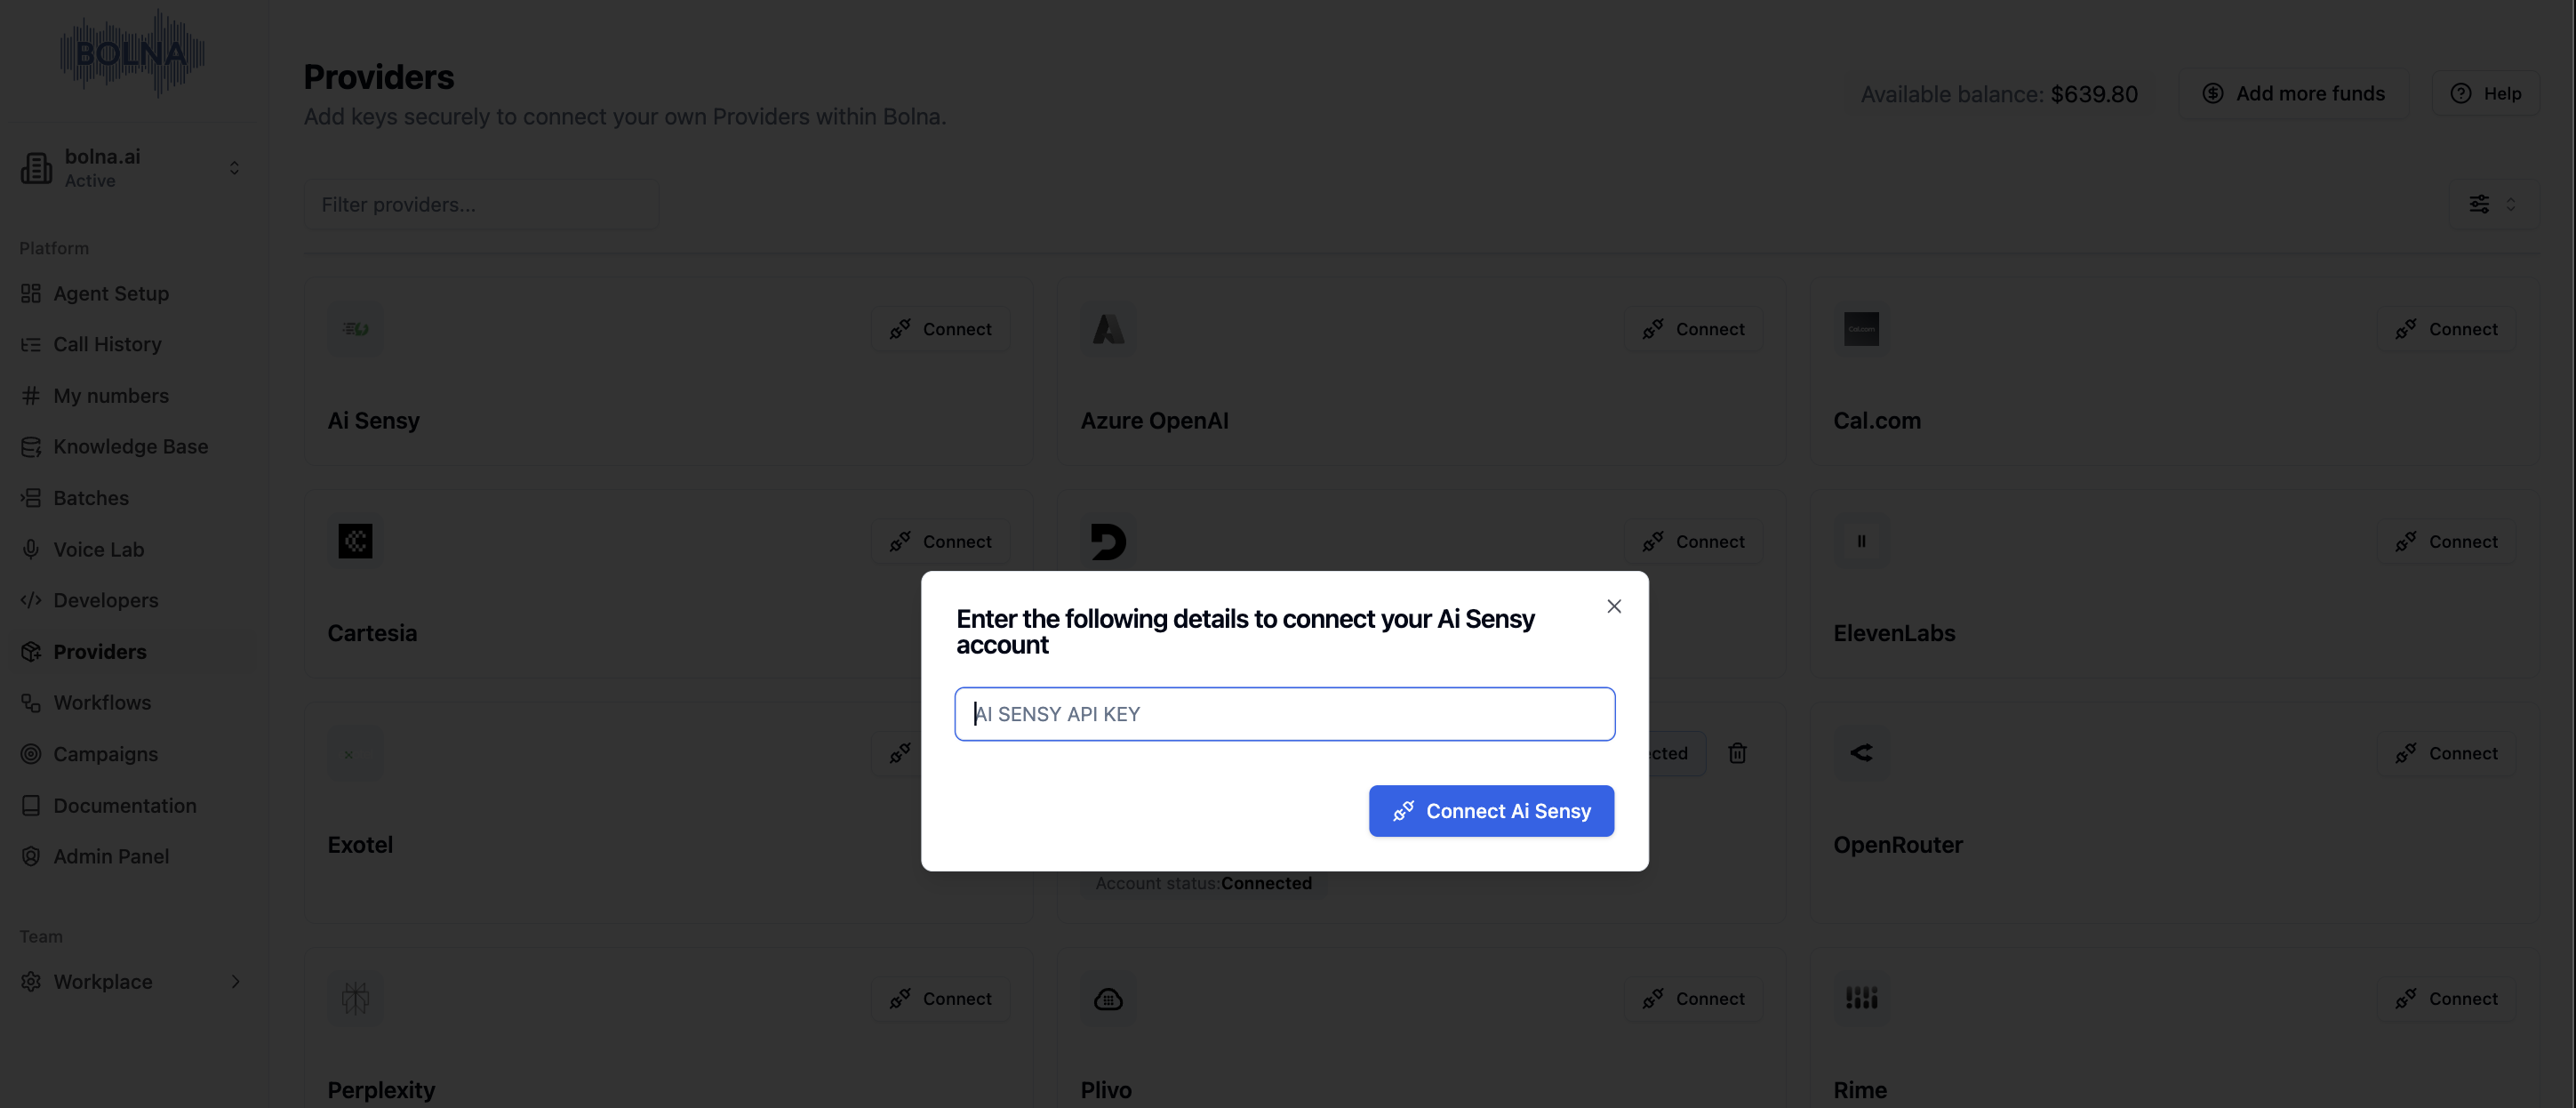
### Configuring WhatsApp Steps
Before adding WhatsApp steps to your workflow, you must first connect your Ai Sensy API key.
**Connect Ai Sensy API Key:**
**Providers** → Search **"Ai Sensy"** → **Connect** → Enter API Key → **Save**
Click **"Save Workflow"** to persist your changes
***
### Configuring WhatsApp Steps
Before adding WhatsApp steps to your workflow, you must first connect your Ai Sensy API key.
**Connect Ai Sensy API Key:**
**Providers** → Search **"Ai Sensy"** → **Connect** → Enter API Key → **Save**
 1. Click on the **WhatsApp step** to open configuration
2. **Template Name**: Your Ai Sensy template (e.g., `welcome_message`)
3. **Parameter Keys**: CSV column names for template parameters (click **"+"** to add multiple)
4. Click **"Save"**
1. Click on the **WhatsApp step** to open configuration
2. **Template Name**: Your Ai Sensy template (e.g., `welcome_message`)
3. **Parameter Keys**: CSV column names for template parameters (click **"+"** to add multiple)
4. Click **"Save"**
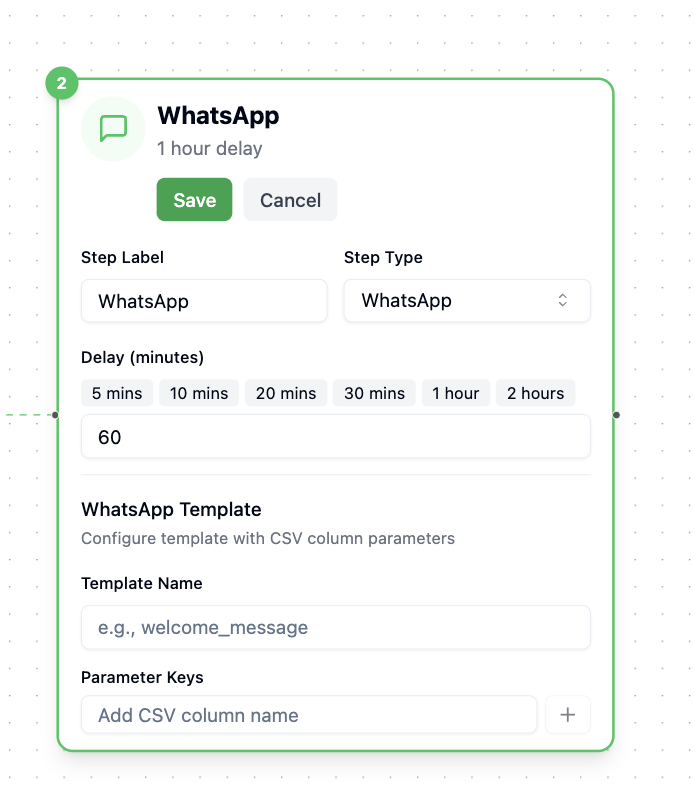 Parameter keys must match CSV headers exactly. Template name must match your approved Ai Sensy template.
***
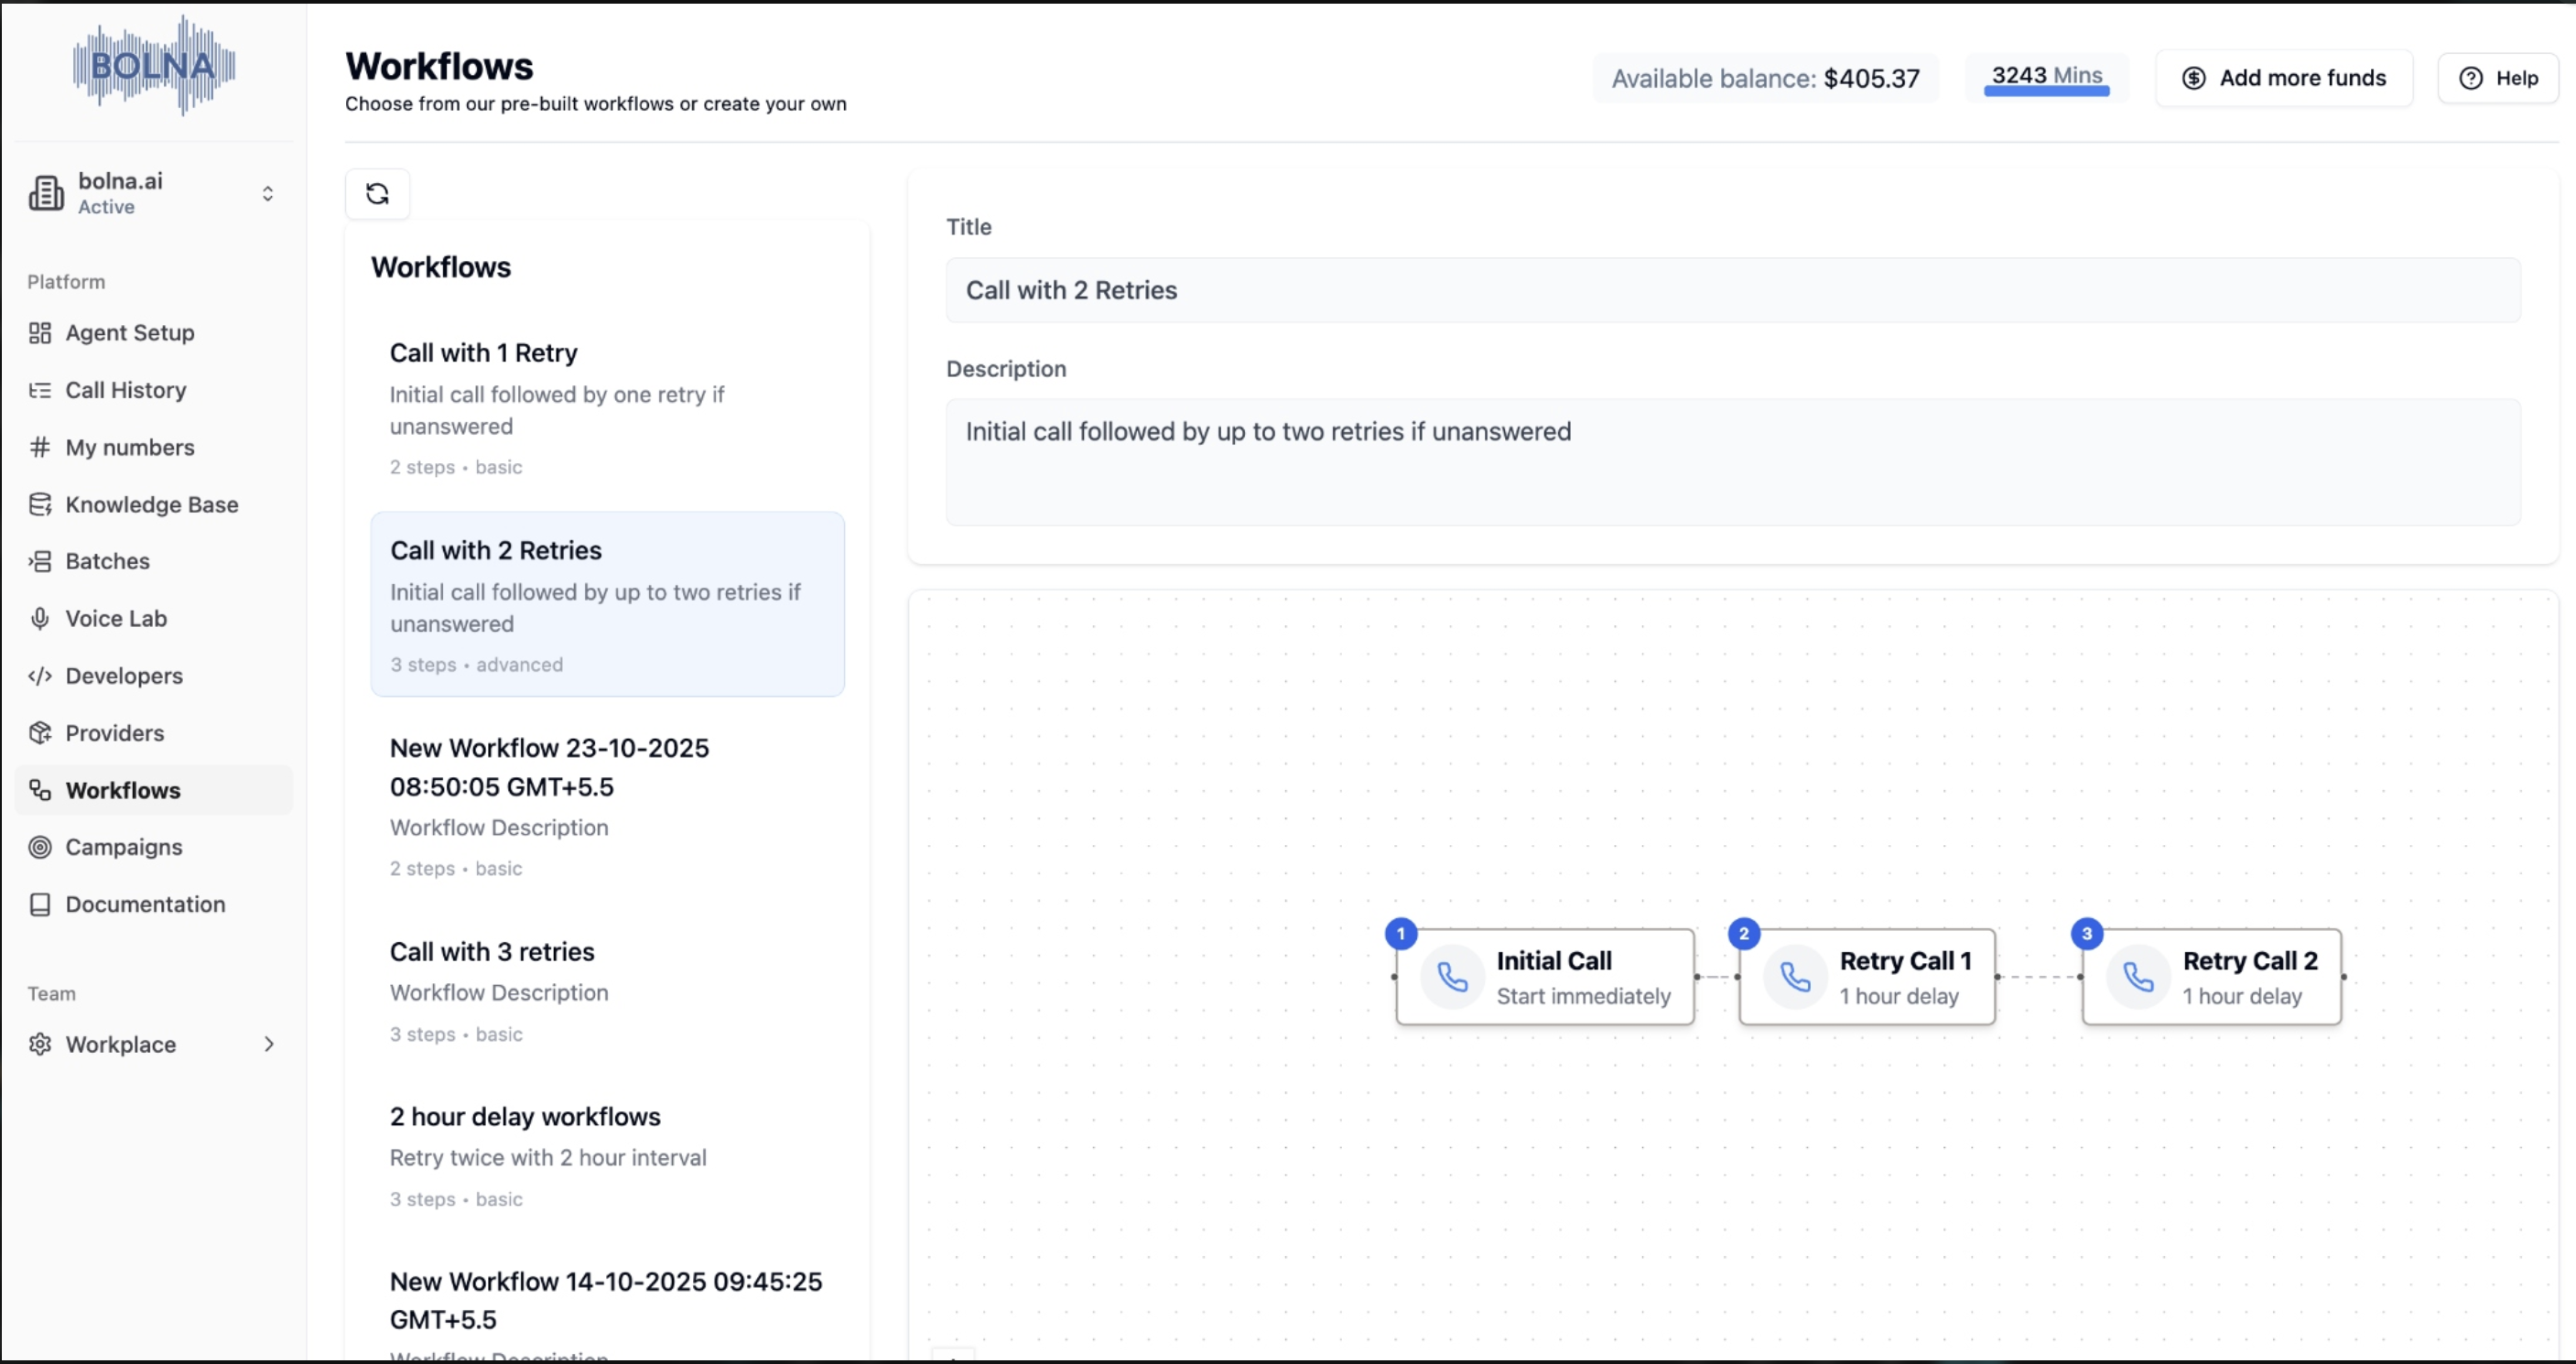
### Workflow Examples
```
Step 1: Call (0 min delay)
```
Simple single-step workflow for immediate outbound calling.
```
Step 1: WhatsApp (0 min delay)
Step 2: Call (30 min delay)
Step 3: Email (60 min delay)
```
WhatsApp notification first, call after 30 minutes, then email follow-up.
***
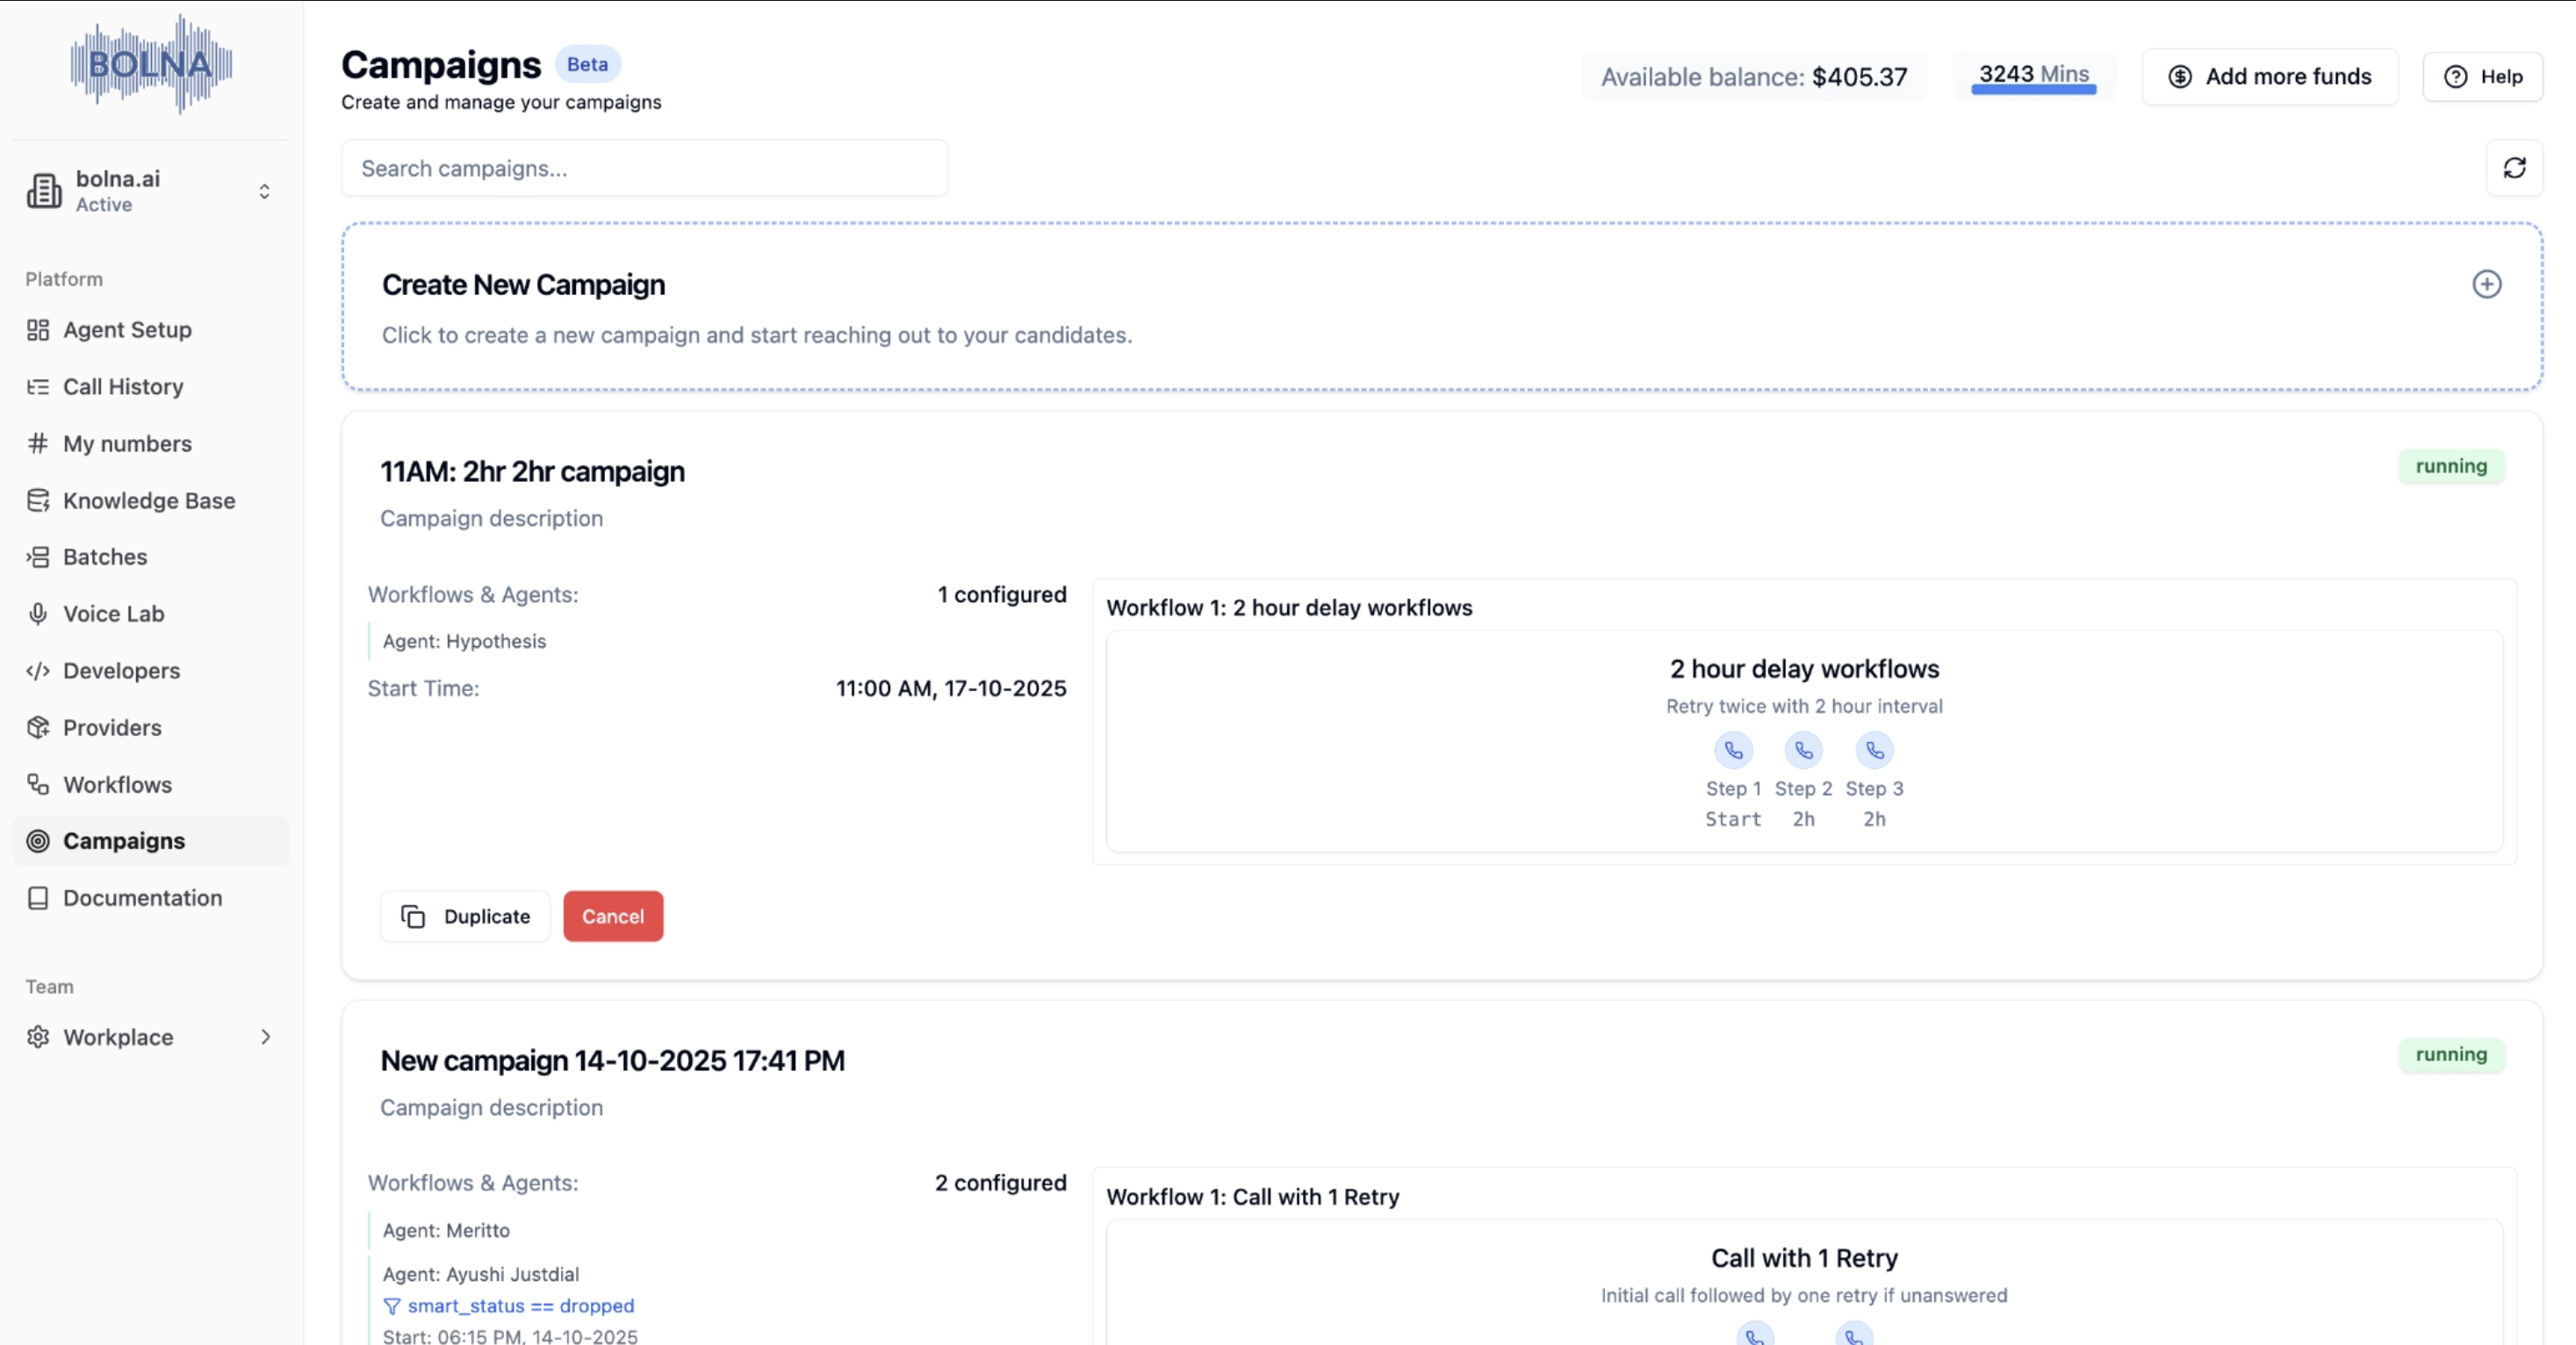
## Campaigns
### What are Campaigns?
Execute workflows with specific contact data, agents, and schedules. Can be single workflow or multi-workflow with conditional logic.
Parameter keys must match CSV headers exactly. Template name must match your approved Ai Sensy template.
***
### Workflow Examples
```
Step 1: Call (0 min delay)
```
Simple single-step workflow for immediate outbound calling.
```
Step 1: WhatsApp (0 min delay)
Step 2: Call (30 min delay)
Step 3: Email (60 min delay)
```
WhatsApp notification first, call after 30 minutes, then email follow-up.
***
## Campaigns
### What are Campaigns?
Execute workflows with specific contact data, agents, and schedules. Can be single workflow or multi-workflow with conditional logic.
 ### Campaign Types
* Execute one workflow across all selected contacts
* Simple setup and execution
* Perfect for basic outreach and follow-up sequences
### Campaign Types
* Execute one workflow across all selected contacts
* Simple setup and execution
* Perfect for basic outreach and follow-up sequences
 * Chain multiple workflows using conditional criteria
* Advanced conditional logic based on call outcomes
* Perfect for complex sales processes and lead nurturing
* Chain multiple workflows using conditional criteria
* Advanced conditional logic based on call outcomes
* Perfect for complex sales processes and lead nurturing
 ***
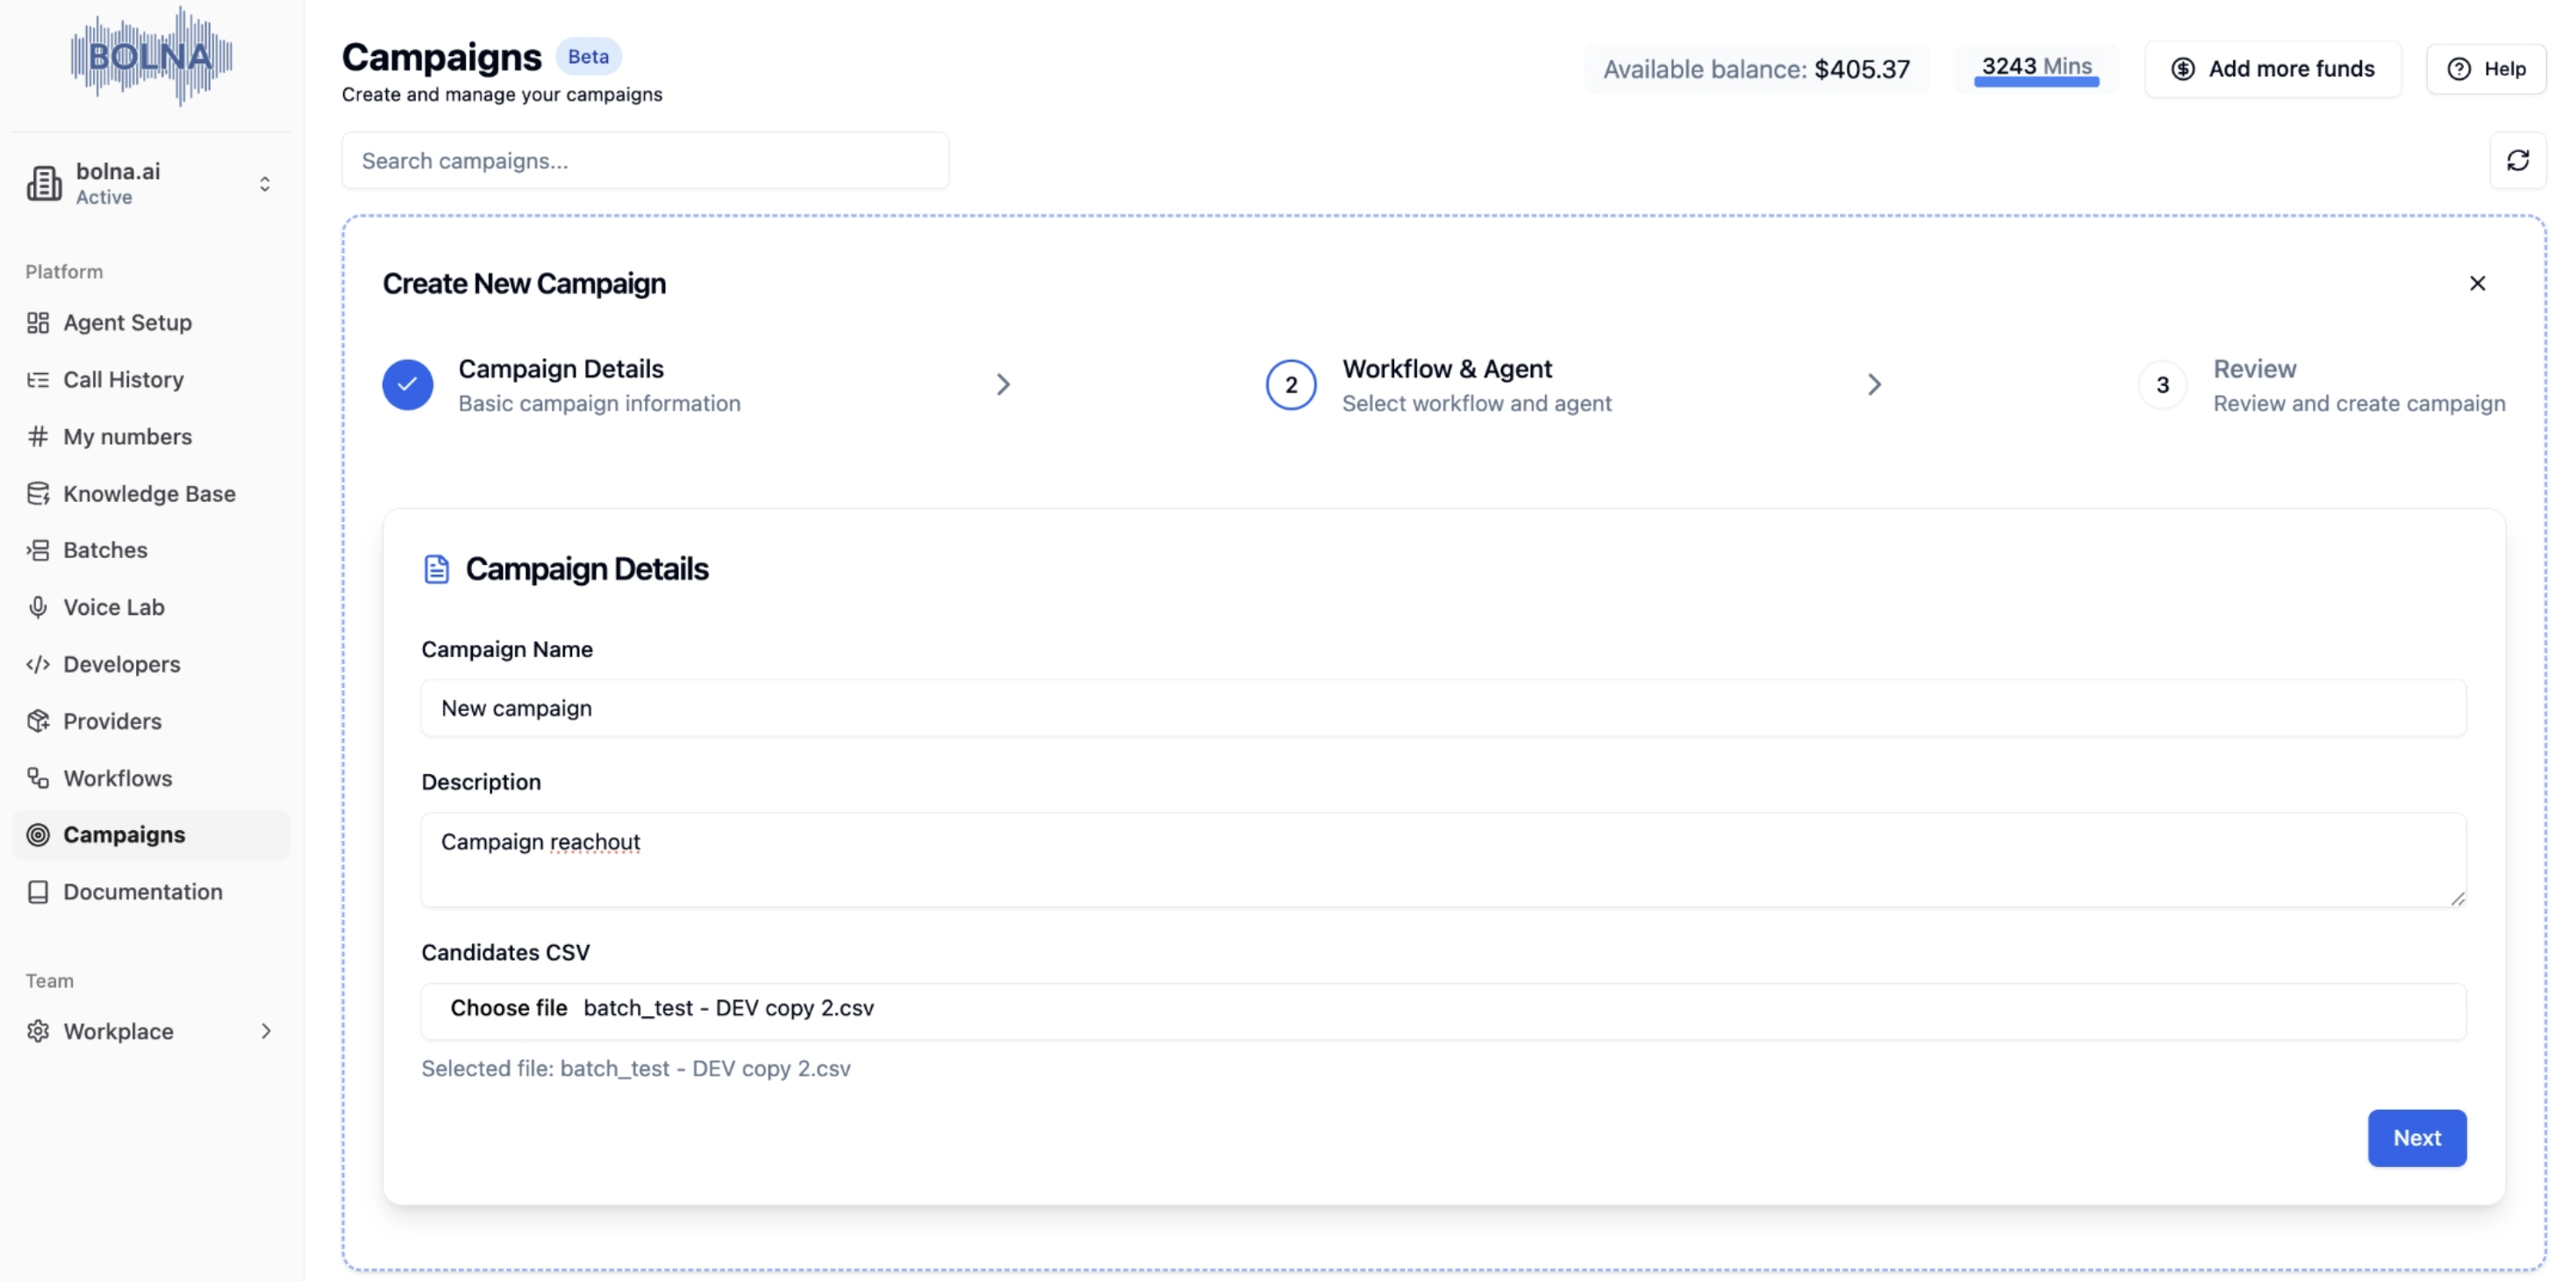
### Creating Campaigns
1. **Campaign Name**: Choose a descriptive name for your campaign
2. **Description**: Optional description of the campaign purpose
3. **CSV File**: Upload contact data in CSV format
* **Required Fields**: Name, phone\_number (in E.164 format)
* **Optional Fields**: Any variables used in the agent
***
### Creating Campaigns
1. **Campaign Name**: Choose a descriptive name for your campaign
2. **Description**: Optional description of the campaign purpose
3. **CSV File**: Upload contact data in CSV format
* **Required Fields**: Name, phone\_number (in E.164 format)
* **Optional Fields**: Any variables used in the agent
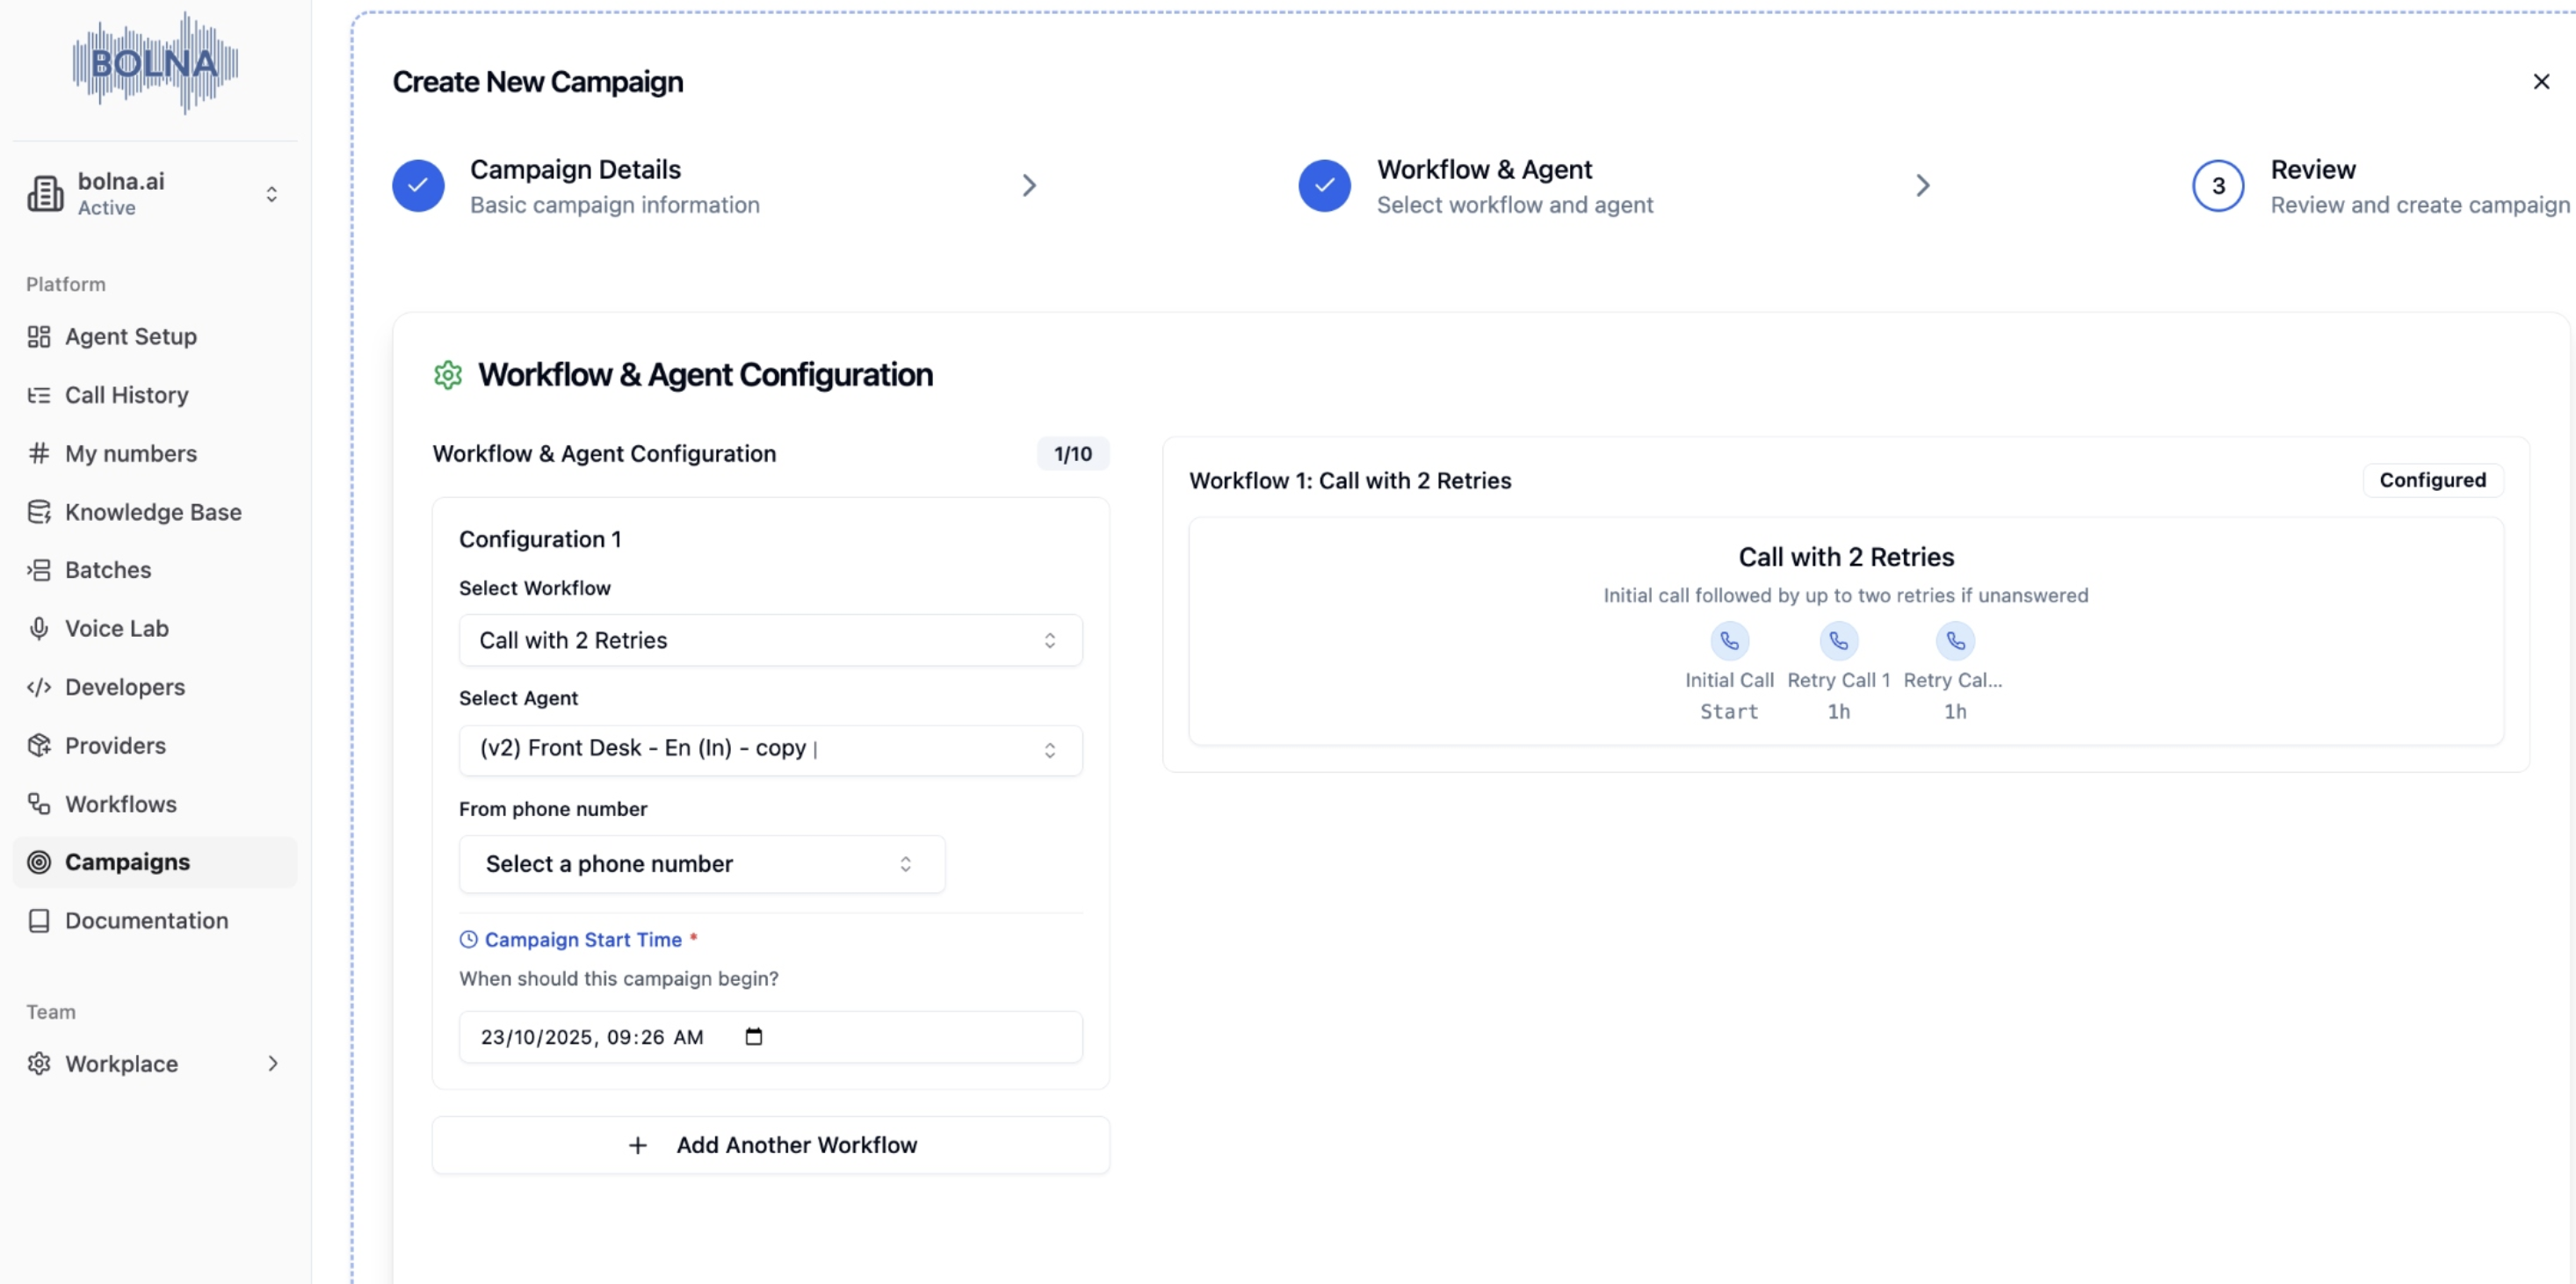
 1. **Select Workflow**: Choose from your available workflows
2. **Select Agent**: Choose the AI assistant for communication
3. **Phone Number**: Optional caller ID for outbound calls
4. **Add Multiple Workflows**: For complex campaigns with multiple workflow pairs
1. **Add Workflow Pairs**: Workflow + Agent combinations
2. **Set Criteria**: Conditions for workflow transitions
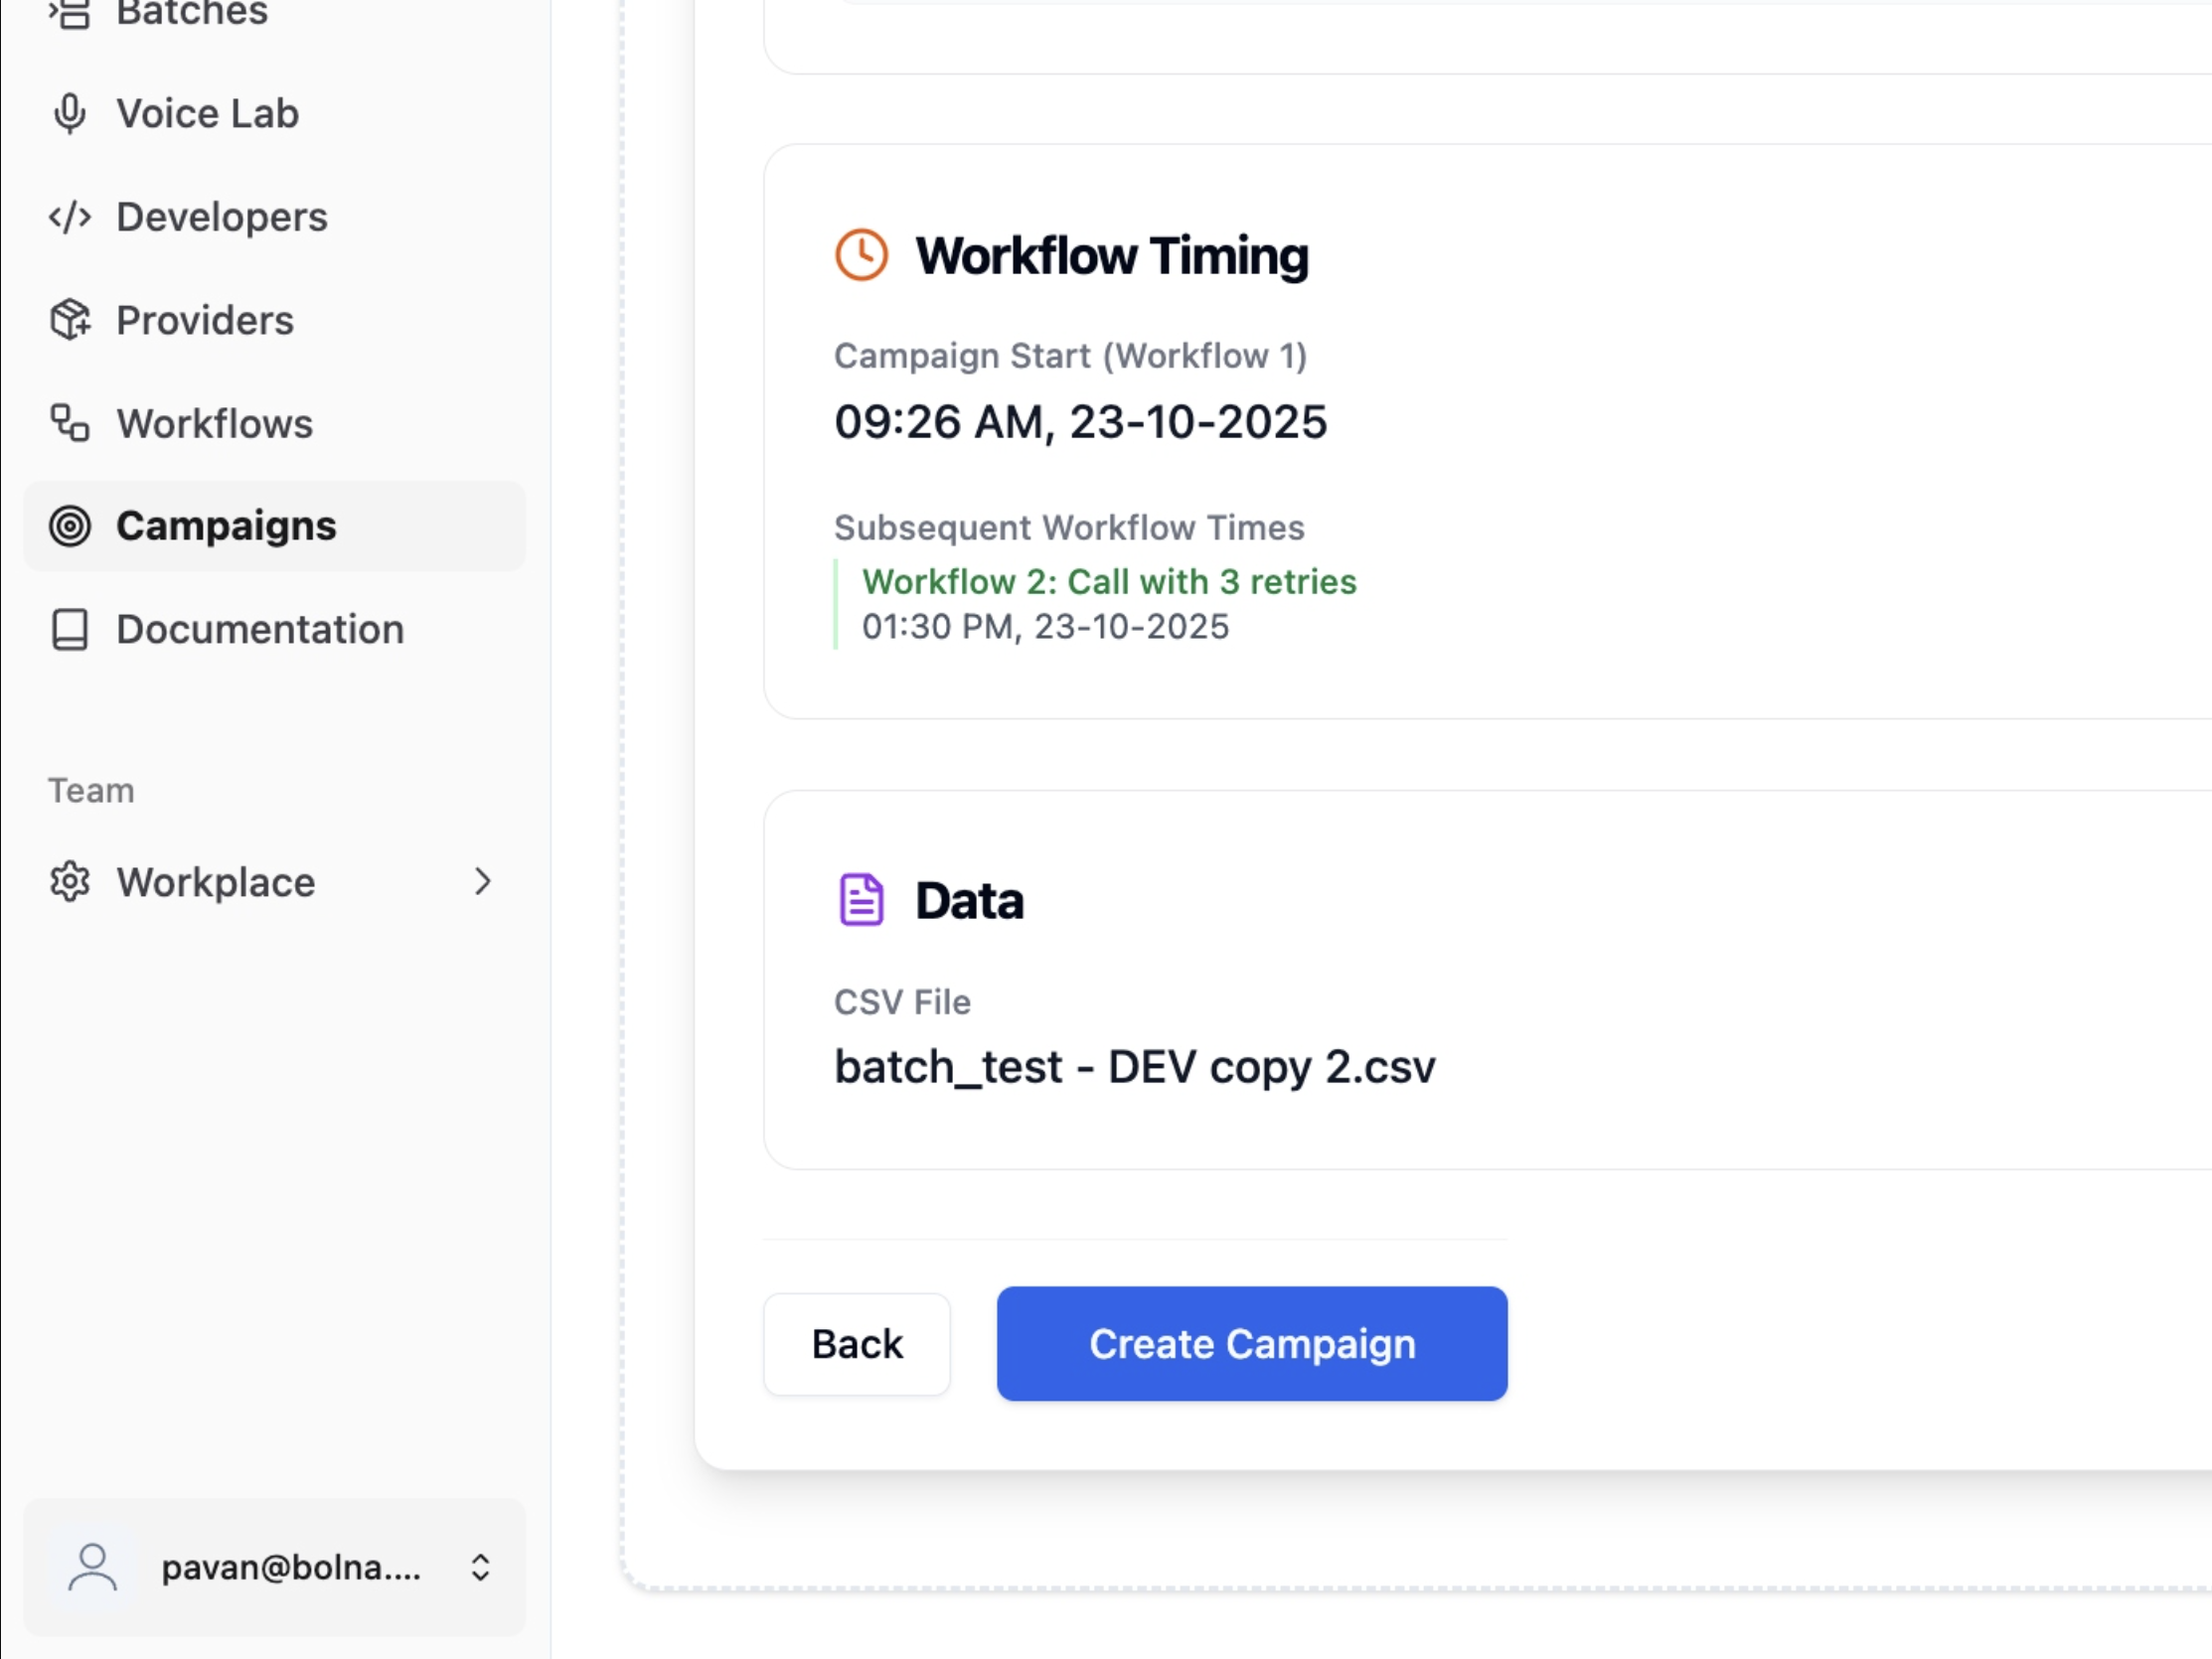
3. **Configure Timing**: When to start next workflow
4. **Test Configuration**: Validate setup before launch
1. **Review Summary**: Check all settings and configurations
2. **Validate Data**: Ensure contact data is correct and complete
3. **Launch Campaign**: Start execution and monitor progress
1. **Select Workflow**: Choose from your available workflows
2. **Select Agent**: Choose the AI assistant for communication
3. **Phone Number**: Optional caller ID for outbound calls
4. **Add Multiple Workflows**: For complex campaigns with multiple workflow pairs
1. **Add Workflow Pairs**: Workflow + Agent combinations
2. **Set Criteria**: Conditions for workflow transitions
3. **Configure Timing**: When to start next workflow
4. **Test Configuration**: Validate setup before launch
1. **Review Summary**: Check all settings and configurations
2. **Validate Data**: Ensure contact data is correct and complete
3. **Launch Campaign**: Start execution and monitor progress
 ***
### Multi-Workflow Campaigns
For multi-workflow campaigns, you can create workflow-agent pairs with specific criteria:
* **Workflow**: Select workflow
* **Agent**: Choose AI assistant
* **Phone Number**: The number agent calls from
* **Workflow**: Select workflow
* **Agent**: Choose AI assistant
* **Phone Number**: The number agent calls from
* **Criteria**: Conditions for transition
* **Next Workflow Time**: When to start next workflow
***
### Criteria and Conditions
| Condition Type | Operators |
| -------------- | -------------------- |
| **Equality** | `==`, `!=` |
| **Comparison** | `>`, `<`, `>=`, `<=` |
| Logical Operator | Behavior |
| ---------------- | --------------------------- |
| **AND** | All conditions must be true |
| **OR** | Any condition can be true |
***
## CSV Data Format
### Required Format
All phone numbers should include the country prefix in [E.164](https://en.wikipedia.org/wiki/E.164) format and use `contact_number` as the header.
```csv example_batch_file.csv theme={"system"}
contact_number,first_name,last_name,email
+91931237890,Bruce,Wayne,bruce@example.com
+91912345678,Bruce,Lee,bruce.lee@example.com
+91921000000,Satoshi,Nakamoto,satoshi@example.com
+44999999007,James,Bond,james@example.com
```
### Callback Matching
When contacts call back, Bolna matches their phone number to the CSV row for personalized conversations.
**Example:** Agent can say: *"Hi John, I see you're calling about the product you showed interest in at Acme Corp."*
### Excel/Google Sheets Tips
In Excel, add an apostrophe before `+` (e.g., `'+91931237890`) to prevent formula interpretation.
***
Campaign system is in beta. Phone call workflows are fully functional. WhatsApp and email coming soon.
Create your first workflow and campaign
***
### Multi-Workflow Campaigns
For multi-workflow campaigns, you can create workflow-agent pairs with specific criteria:
* **Workflow**: Select workflow
* **Agent**: Choose AI assistant
* **Phone Number**: The number agent calls from
* **Workflow**: Select workflow
* **Agent**: Choose AI assistant
* **Phone Number**: The number agent calls from
* **Criteria**: Conditions for transition
* **Next Workflow Time**: When to start next workflow
***
### Criteria and Conditions
| Condition Type | Operators |
| -------------- | -------------------- |
| **Equality** | `==`, `!=` |
| **Comparison** | `>`, `<`, `>=`, `<=` |
| Logical Operator | Behavior |
| ---------------- | --------------------------- |
| **AND** | All conditions must be true |
| **OR** | Any condition can be true |
***
## CSV Data Format
### Required Format
All phone numbers should include the country prefix in [E.164](https://en.wikipedia.org/wiki/E.164) format and use `contact_number` as the header.
```csv example_batch_file.csv theme={"system"}
contact_number,first_name,last_name,email
+91931237890,Bruce,Wayne,bruce@example.com
+91912345678,Bruce,Lee,bruce.lee@example.com
+91921000000,Satoshi,Nakamoto,satoshi@example.com
+44999999007,James,Bond,james@example.com
```
### Callback Matching
When contacts call back, Bolna matches their phone number to the CSV row for personalized conversations.
**Example:** Agent can say: *"Hi John, I see you're calling about the product you showed interest in at Acme Corp."*
### Excel/Google Sheets Tips
In Excel, add an apostrophe before `+` (e.g., `'+91931237890`) to prevent formula interpretation.
***
Campaign system is in beta. Phone call workflows are fully functional. WhatsApp and email coming soon.
Create your first workflow and campaign